Have you ever noticed a faint, acrid plume of smoke drifting out from your kitchen when baking a simple batch of cookies? Or perhaps you have wondered why your perfectly measured birthday cakes are suddenly cooking unevenly on one side? The culprit is rarely your recipe or your culinary skills; it is the invisible accumulation of carbonized fats and vaporized grease clinging to the interior walls of your cooking unit. Did you know that the crusty, burnt residue at the bottom of your oven could be subtly altering the flavor of everything you bake while secretly driving up your monthly energy bill?
Taking the time to perform a thorough oven cleaning is a fundamental task that impacts everything from indoor air quality to the precise thermal mechanics of your home cooking. When drippings from last month’s lasagna or splatters from a roasted chicken are left to bake repeatedly at high temperatures, they undergo a chemical transformation. They turn into stubborn carbon deposits that break down into volatile compounds, releasing foul odors and smoke that alter the delicate flavor profile of your food.
Addressing this buildup does not require relying on toxic, industrial-grade chemicals that leave behind harsh fumes for days. By approaching the process systematically with the correct tools, you can break down years of baked-on residue safely and efficiently. Let us break down the exact process required to reset your cooking appliance back to its optimal, high-performance state.
Things You Need
Crucial Equipment for Deep De-Carbonization
Before you begin, gather all necessary tools to avoid stopping mid-process. Selecting non-abrasive tools is essential, as harsh steel wool or scrapers can permanently damage the sensitive porcelain enamel coating inside your appliance, leading to premature rusting.
Step-by-Step Tips
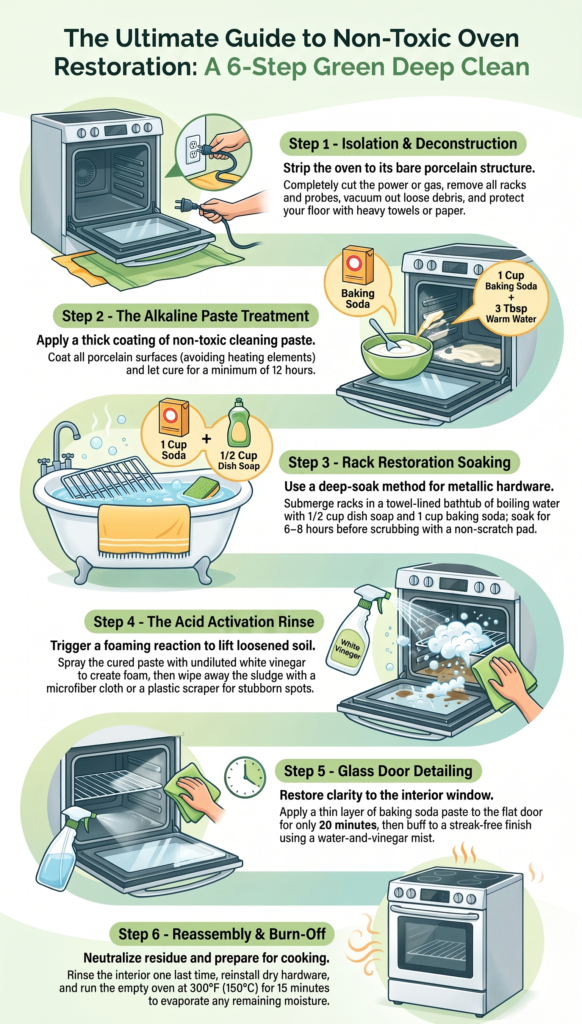
Step 1: Isolation and Deconstruction
The initial stage of any successful oven cleaning project requires removing all internal variables so you can work on a completely bare porcelain structure.
-
Cut the power entirely: For safety, completely shut off the gas valve or unplug the electrical connection to ensure heating elements cannot engage while you work.
-
Extract all internal hardware: Remove the heavy wire racks, side tracks, baking trays, and any integrated thermometer probes.
-
Protect your workspace floors: Lay down a thick layer of old bath towels or heavy construction paper on the floor directly beneath the door to catch any accidental drips or falling paste.
-
Clear loose debris: Use a hand vacuum or a small brush to sweep out any loose, loose crumbs or burnt carbon flakes sitting on the base before applying liquids.
Step 2: The Alkaline Paste Treatment
To break down hardened carbon without using caustic commercial products, you need to allow a mild alkaline reaction to work over an extended period.
-
Mix the coating paste: In a medium bowl, mix one cup of baking soda with roughly three tablespoons of warm water until it forms a spreadable paste.
-
Avoid the heating elements: Using a paintbrush or wearing rubber gloves, spread the paste over all interior porcelain surfaces, making sure to avoid getting paste on the electrical heating loops or gas burner ports.
-
Target the heavy grease areas: Apply a thicker layer of paste to the back wall and bottom panel, where bubbling grease and fat splatters naturally concentrate during roasting.
-
Allow for overnight curing: Let the paste sit undisturbed for a minimum of twelve hours; this extended time allows the baking soda to safely break down the molecular bonds of the baked-on grease.
Step 3: Rack Restoration Soaking
While the interior paste is breaking down grease inside the appliance, turn your attention to the wire racks, which require a different cleaning technique due to their metallic composition.
-
Prepare a deep soaking tub: Line your bathtub with an old towel to prevent scratching, place the wire racks on top, and fill the tub with boiling water until the metal is completely submerged.
-
Introduce grease-cutting agents: Pour half a cup of concentrated dishwashing liquid and one cup of baking soda into the water, stirring gently to dissolve the mixture.
-
Let the solution work: Allow the racks to soak for six to eight hours, which softens the stubborn dark grime clinging to the thin wire intersections.
-
Scrub with light abrasive pads: Use a non-scratch nylon scrub sponge to wipe away the loosened grease, rinse thoroughly with fresh water, and dry completely with a clean towel.
Step 4: The Acid Activation Rinse
After the interior paste has cured overnight, activate the mixture to lift the loosened soil away from the porcelain panels.
-
Load your acid spray: Fill a clean spray bottle with undiluted white vinegar and adjust the nozzle to a wide mist setting.
-
Mist the paste surfaces: Spray the vinegar directly onto the dried baking soda paste, which triggers an immediate foaming reaction that lifts the grease away from the walls.
-
Wipe away the initial sludge: Use a damp microfiber cloth to wipe away the bulk of the foaming paste, rinsing the cloth frequently in a bucket of clean, warm water.
-
Employ the plastic scraper: For stubborn carbon spots that refuse to slide off, use your plastic putty knife to gently pry beneath the deposit without scratching the enamel.
Step 5: Glass Door Detailing
The interior glass window requires specialized care, as it is highly prone to unsightly grease streaks and can easily scratch if handled roughly.
-
Assess the glass surface: Open the door flat to create a stable working platform and wipe away any loose dust with a dry towel.
-
Apply a gentle paste layer: Spread a thin coating of your baking soda paste over the glass window, avoiding any rubber or fiberglass gaskets lining the edge.
-
Let it sit briefly: Allow the mixture to rest on the glass for only twenty minutes, as glass releases carbonized oils much faster than porcelain enamel surfaces do.
-
Buff to a clear finish: Wipe the paste away using a clean microfiber towel, spray lightly with a mix of water and vinegar, and buff with a dry rag until the glass is completely streak-free.
Step 6: Final Inspection and Reassembly
The final phase involves neutralizing any remaining residue and restoring your appliance to full operational status.
-
Conduct a final clear rinse: Wipe down the entire interior one last time with a microfiber towel dampened with clean water to ensure no powdery white residue remains.
-
Inspect the air vents: Check that all internal air circulation vents and gas ports are completely free of paste or water blockages.
-
Reinstall the dry hardware: Slide the clean wire side tracks and racks back into their positions.
-
Restore power and burn off moisture: Reconnect the power and run the appliance empty at 300°F (150°C) for fifteen minutes to evaporate any lingering moisture before cooking food.
Extra Tips Section
-
The Steam Preventative Trick: Once a month, place a large oven-safe bowl filled with water and lemon slices inside your unit, turn the heat to 250°F (120°C) for twenty minutes, and let the steam loosen light grease before it hardens.
-
Enamel Shielding Strategy: Avoid using cheap aluminum foil liners on the bottom floor to catch drips, as the intense heat can permanently melt the foil onto your porcelain enamel.
-
The Razor Blade Technique: For glass windows with mineral scaling, hold a fresh razor blade at a flat 45-degree angle to safely shave off individual burnt spots without scratching the glass pane.
-
Gasket Protection Rule: Always avoid scrubbing the woven fiberglass door seals; cleaning these delicate gaskets can fray the fibers, breaking the heat seal and leading to energy loss.
Facts Section
-
Thermal Regulation Inefficiency: A dark layer of carbonized soot on interior surfaces absorbs heat unevenly, causing the appliance to consume up to 10 percent more energy to maintain standard temperatures.
-
Fire Hazard Origins: According to national fire protection data, the accumulation of old cooking grease and fat splatters ranks as one of the leading causes of residential kitchen fires.
-
Listeria Resistance: While cold storage units battle distinct bacteria, dirty cooking environments can harbor charred food debris that attracts pests and leads to mold growth when left unheated for long periods.
Advantages Section
-
Uncompromised Food Flavors: Removing burnt carbon ensures that delicate pastries and roasts are not tainted by acrid smoke or bitter charcoal odors during the baking process.
-
Accurate Temperature Distribution: Clean internal panels reflect radiant heat evenly, ensuring your roasts and baked goods cook uniformly without requiring you to constantly rotate your trays.
-
Lower Household Utility Bills: A clean appliance heats up faster and maintains its target temperature efficiently, reducing wear on your heating elements and lowering your energy costs.
Frequently Asked Questions
Q1: Why should I avoid using the built-in self-cleaning cycle?
The automatic self-cleaning setting uses extreme heat—often exceeding 800°F (425°C)—to incinerate grease. This intense temperature can damage electronic control boards, short-out thermal fuses, and fill your home with dangerous carbon monoxide fumes from burning grease.
Q2: How can I tell if my door gasket needs replacing?
If you notice heat escaping from the front of the appliance, or if the door feels hot to the touch during use, test the seal. Shut the door on a dollar bill; if you can pull the bill out easily without resistance, your gasket has lost its elasticity and needs to be replaced.
Q3: What causes white powdery spots to appear after cleaning?
White streaks are simply harmless baking soda residue left behind after the vinegar rinse. To fix this, wipe the area down with a microfiber cloth dampened with a 50/50 mix of warm water and white vinegar to completely neutralize the powder.
Final Thoughts
Investing the time into a proper, meticulous deep clean of your primary cooking appliance is a rewarding home project that pays immediate dividends. By moving away from aggressive, caustic store-bought sprays and choosing a systematic, non-destructive approach, you preserve the structural integrity of your appliance’s interior enamel while creating a much safer kitchen environment for your family. A clean appliance runs more efficiently, lasts longer, and ensures your meals taste exactly as intended.
Treat this maintenance routine as a proactive investment in your home’s safety, your appliance’s lifespan, and your culinary results. With a small amount of regular attention, you can keep your kitchen running smoothly and efficiently for years to come.