Most homeowners assume that because water and soap constantly flow through it, the kitchen basin stays relatively sanitary. In reality, biological testing reveals a disturbing truth: the average household wash basin contains more fecal bacteria than a freshly flushed toilet bowl. Food debris, raw meat residue, and consistent moisture create an ideal microscopic breeding ground.
Standard rinsing simply moves surface debris around without breaking down the invisible, stubborn biofilm clinging to the basin walls. To truly neutralize these microscopic threats and lift deep-set mineral stains, you need a targeted physical and chemical approach. Deep sink scrubbing is not just an aesthetic chore—it is a critical line of defense for household health and food safety. By breaking down the task into a logical sequence, you can dissolve grease, kill pathogens, and restore an incredible mirror-like shine to your basin.
Essential Supplies Checklist
Before beginning, gather the specific tools and agents required to lift stains without degrading the basin material. Using the wrong abrasive can permanently scratch and dull the surface, making it easier for grime to take hold in the future.
Core Cleaning Agents
-
Sodium Bicarbonate (Baking Soda): Acts as a mild, non-scratching crystal abrasive that breaks down organic soils and neutralizes odors.
-
Distilled White Vinegar (5% Acidity): An acidic agent that cuts through alkaline hard water deposits, limescale, and soap scum.
-
Hydrogen Peroxide (3% Concentration): A safe, color-safe oxidizing agent that sanitizes surfaces and removes dark organic stains.
-
Liquid Castile Soap or Concentrated Dish Soap: Provides the surface-active agents (surfactants) necessary to lift and suspend oily residues.
Physical Tools
-
Non-Scratch Cellulose Sponges: Dual-sided pads with a soft absorbent side and a gentle scrubbing surface.
-
Firm-Bristled Detail Brushes: Essential for reaching tight structural gaps around the drain lip, faucet base, and overflow channels.
-
Microfiber Polishing Cloths: High-density woven cloths designed to catch final residues and buff surfaces to a streak-free finish.
-
Protective Nitrile Gloves: Shields skin from drying out due to prolonged exposure to acidic and alkaline compounds.
Step-by-Step Basin Restoration Technique
Follow this exact sequence to systematically lift grime, eliminate bacterial colonies, and seal the surface against rapid re-soiling.
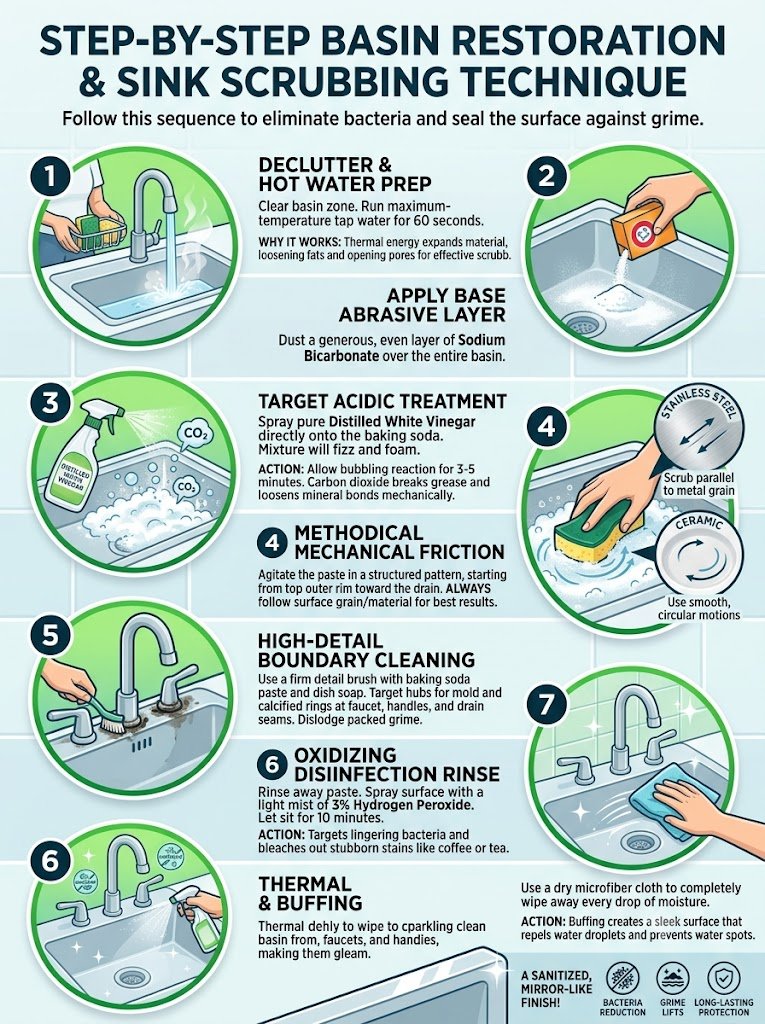
Step 1: Declutter and Hot Water Prep
Clear all dishes, sponge caddies, and drying racks entirely out of the basin zone. Run maximum-temperature tap water over the entire surface for 60 seconds.
Why this works: The thermal energy from the hot water expands the metal or composite material slightly, loosening hardened fats and opening structural pores to make the mechanical scrubbing much more effective.
Step 2: Applying the Base Abrasive Layer
While the surface is still damp, dust a generous, even layer of sodium bicarbonate across the entire basin floor and walls. It should stick to the vertical surfaces, creating a thin white paste appearance.
Step 3: The Target Acidic Treatment
Fill a spray bottle with pure distilled white vinegar. Spray the acid directly onto the sodium bicarbonate layer. The mixture will immediately begin to fizz and foam vigorously as a chemical reaction produces carbon dioxide gas.
Allow this foaming reaction to work undisturbed for three to five minutes. The bubbling action mechanically breaks apart stubborn grease films and loosens mineral bonds without requiring any manual effort from you.
Step 4: Methodical Mechanical Friction
Take your damp, non-scratch sponge and begin agitating the paste. Always work in a structured pattern, starting from the top outer rim and working your way downward toward the central drain.
If you are treating a stainless steel basin, identify the brushed direction of the metal (the grain) and scrub exclusively parallel to those lines. Scrubbing across the grain creates microscopic scratches that catch light and dull the finish over time. For ceramic basins, use smooth, circular motions to avoid creating uneven wear marks on the protective glaze.
Step 5: High-Detail Boundary Cleaning
The areas surrounding the faucet base, handles, and drain seams are notorious hubs for mold and calcified hard water rings. Dip a firm detail brush or an old toothbrush into a concentrated paste of baking soda and dish soap.
Work the bristles deeply into the overlapping metal seams and rubber gaskets. Use short, high-pressure back-and-forth strokes to dislodge the dark, packed grime that sponges completely miss.
Step 6: The Oxidizing Disinfection Rinse
Rinse away the residual paste with warm water. Next, spray the entire surface with a light mist of 3% hydrogen peroxide. Let it sit for ten minutes. This step targets the lingering bacterial colonies and bleaches out stubborn coffee or tea stains without relying on harsh chlorine bleach fumes. Rinse thoroughly one final time.
Step 7: Complete Thermal Dehydration and Buffing
Use a dry microfiber cloth to completely wipe away every drop of moisture from the basin, faucets, and handles. Allowing water to air-dry on the surface introduces dissolved minerals back onto the clean material, leaving cloudy water spots. Buffing the dry metal with a fresh cloth creates a sleek surface that naturally repels water droplets.
Pro-Tips for Advanced Care
-
The Citrus Shield Technique: After drying the basin, rub a fresh lemon peel across the surfaces. The natural limonene oils act as a mild water repellant and leave a clean fragrance.
-
Flour Polishing for Steel: For an ultra-high gloss finish on stainless steel, sprinkle a handful of dry all-purpose flour into a completely dry basin. Buff vigorously with a cloth, then rinse. The tiny particles polish out micro-scratches beautifully.
-
Drain Odor Neutralization: Pour half a cup of baking soda down the drain, followed by a cup of heated vinegar. Let it sit for ten minutes before flushing with boiling water to keep the plumbing sweet-smelling.
Surprising Facts About Home Maintenance
-
Biofilm Defense: Bacteria construct a protective slime layer called a biofilm within 24 hours of surface exposure, making daily rinsing inadequate.
-
Material Porosity: Even materials like solid granite composite possess micro-pores that absorb oils if not cleaned systematically with surfactants.
-
Chemical Conflicts: Mixing ammonia-based cleaners with chlorine bleach creates hazardous chloramine gas; sticking to natural agents avoids chemical accidents.
Major Advantages of a Controlled Cleaning Routine
-
Extended Hardware Lifespan: Removing corrosive limescale and hard water buildup prevents premature pitting and degradation of metal faucet fixtures.
-
Drastic Pathogen Reduction: Methodical decontamination breaks down vectors for foodborne illnesses like Salmonella and E. coli.
-
Enhanced Ambient Esthetics: A highly reflective basin reflects natural light throughout the room, instantly making the entire kitchen appear brighter and cleaner.
Frequently Asked Questions
How frequently should I perform a deep sink scrubbing?
A comprehensive structural scrub should be completed once per week to prevent biofilms from hardening. However, a quick sanitizing wipe down should occur daily after washing raw proteins or prepping fresh produce.
Can I safely use steel wool on a stained porcelain wash basin?
No. Steel wool will leave grey metallic track marks and abrade the smooth protective glass glaze of porcelain, creating a permanently rough surface that stains even faster. Stick to soft sponges and chemical lifting agents.
Why do white spots appear on my basin immediately after it dries?
Those are mineral deposits left behind by hard water. When tap water evaporates naturally, calcium and magnesium are left behind. Drying the area manually with a microfiber cloth entirely prevents this issue.
Final Thoughts
Maintaining a clean and hygienic kitchen basin does not require aggressive industrial chemicals or hours of exhausting physical labor. By understanding the chemistry behind everyday items like baking soda and vinegar, you can easily break down the most stubborn stains and dangerous bacterial colonies. Adopting a structured, step-by-step cleaning routine ensures that your kitchen’s hardest-working zone stays genuinely safe, functional, and beautiful for years to come.