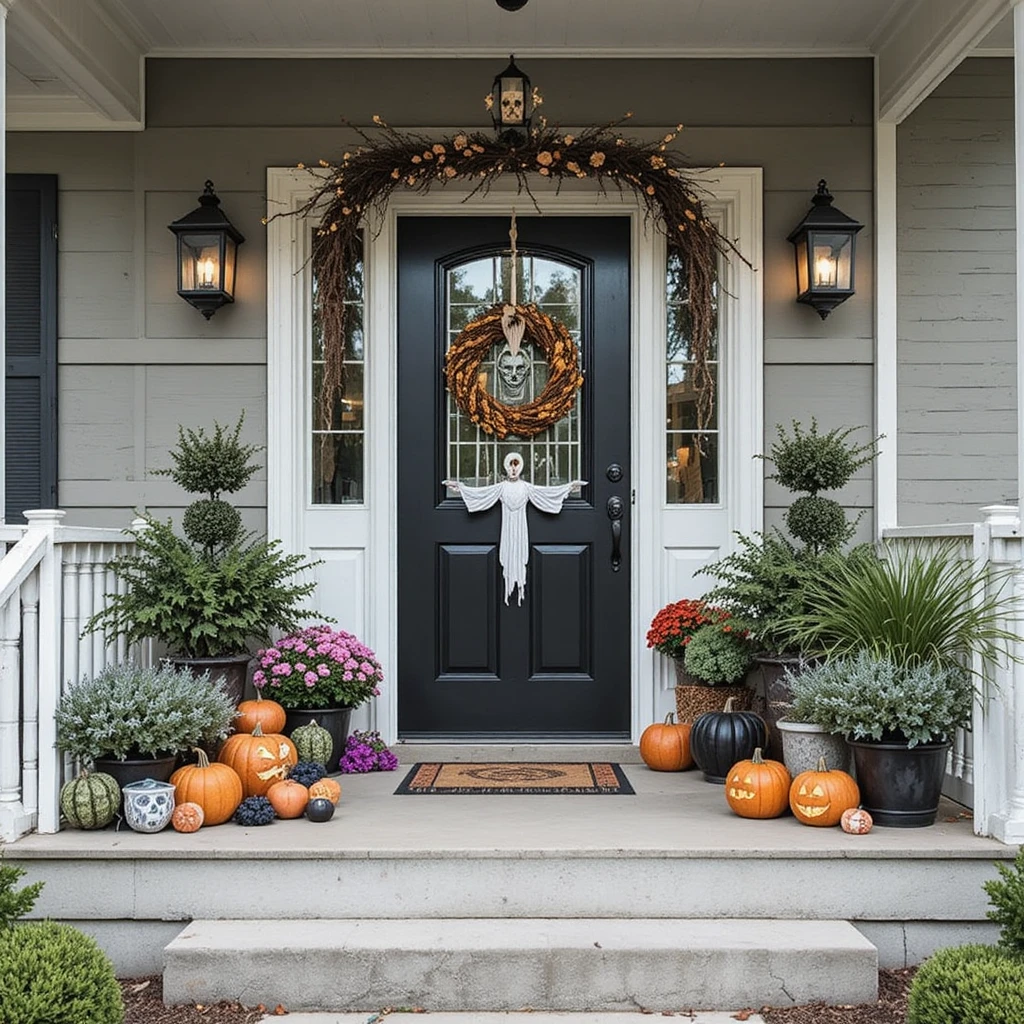
Transforming your front porch into a spine-chilling spectacle is the ultimate way to celebrate Halloween.
Whether you’re aiming for bone-chilling terror or playful spookiness, these scary Halloween front porch decor ideas will help you create an unforgettable entrance that sets the perfect tone for the season.
From DIY budget-friendly projects to showstopping displays, discover how to make your porch the most haunted spot on the block.
Why Front Porch Halloween Decorations Matter
Your front porch serves as the gateway to your Halloween celebration. It’s the first impression trick-or-treaters and guests experience, making it essential to create an atmosphere that captures the spirit of the season. A well-decorated Halloween front porch not only showcases your creativity but also builds anticipation and excitement for everyone who approaches your home.
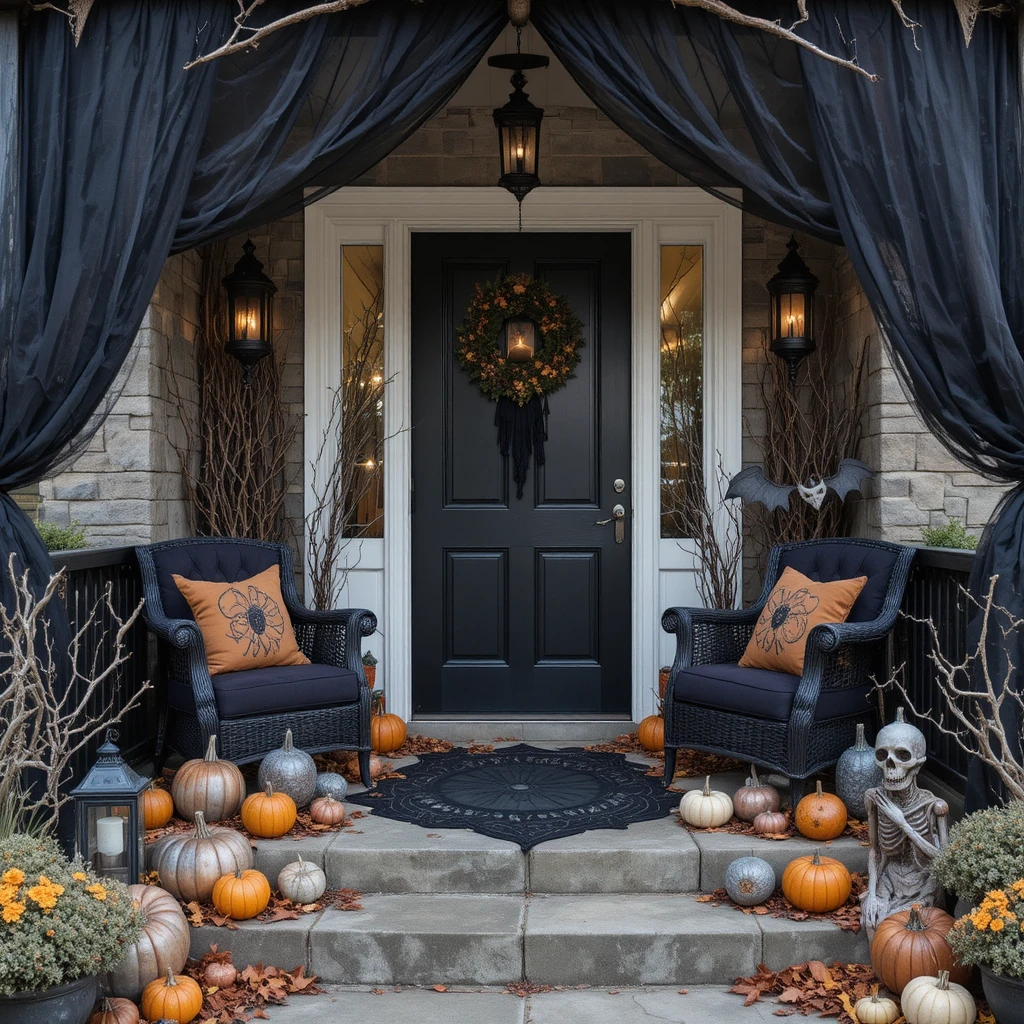
The beauty of scary Halloween front porch decor lies in its versatility. You can achieve impressive results without breaking the bank by combining store-bought items with creative DIY projects. The key is layering different elements to create depth, atmosphere, and visual interest that tells a cohesive spooky story.
Creepy Creatures: Classic Halloween Front Porch Ideas
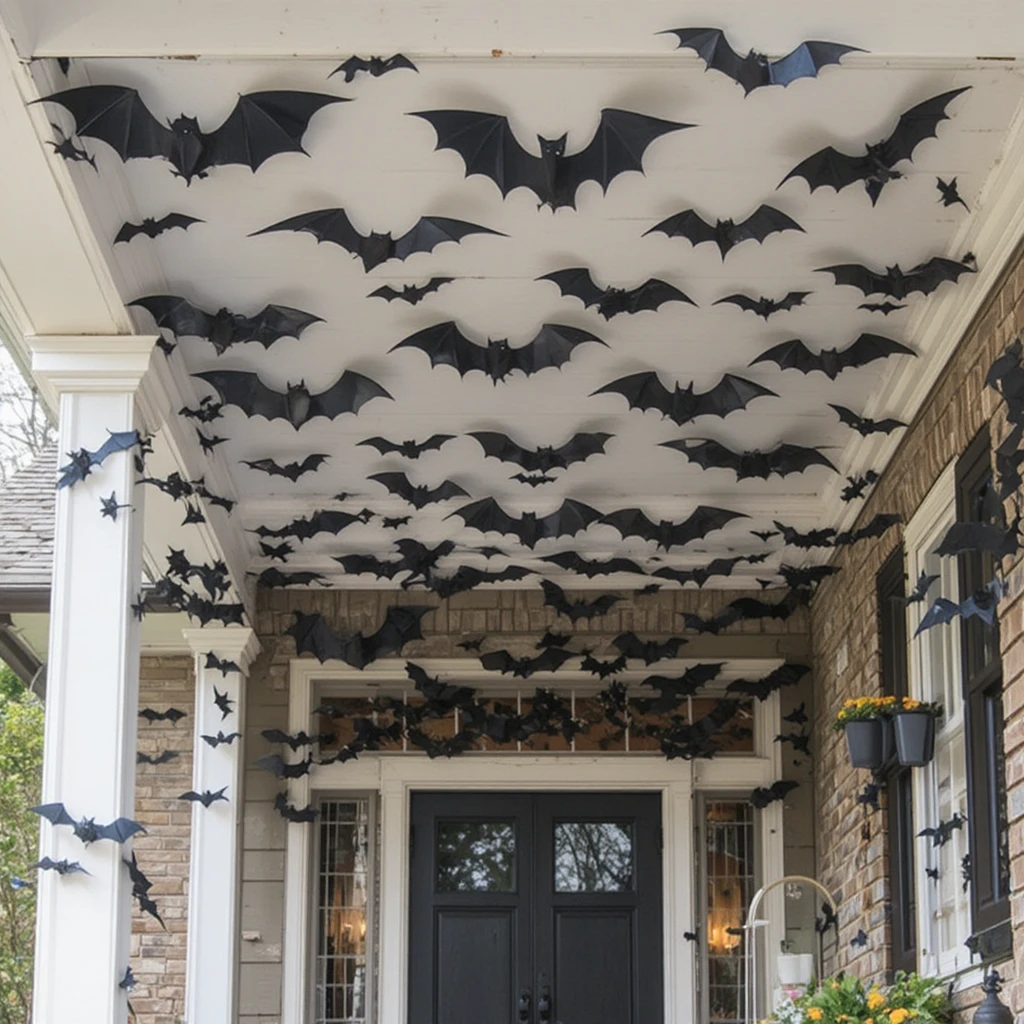
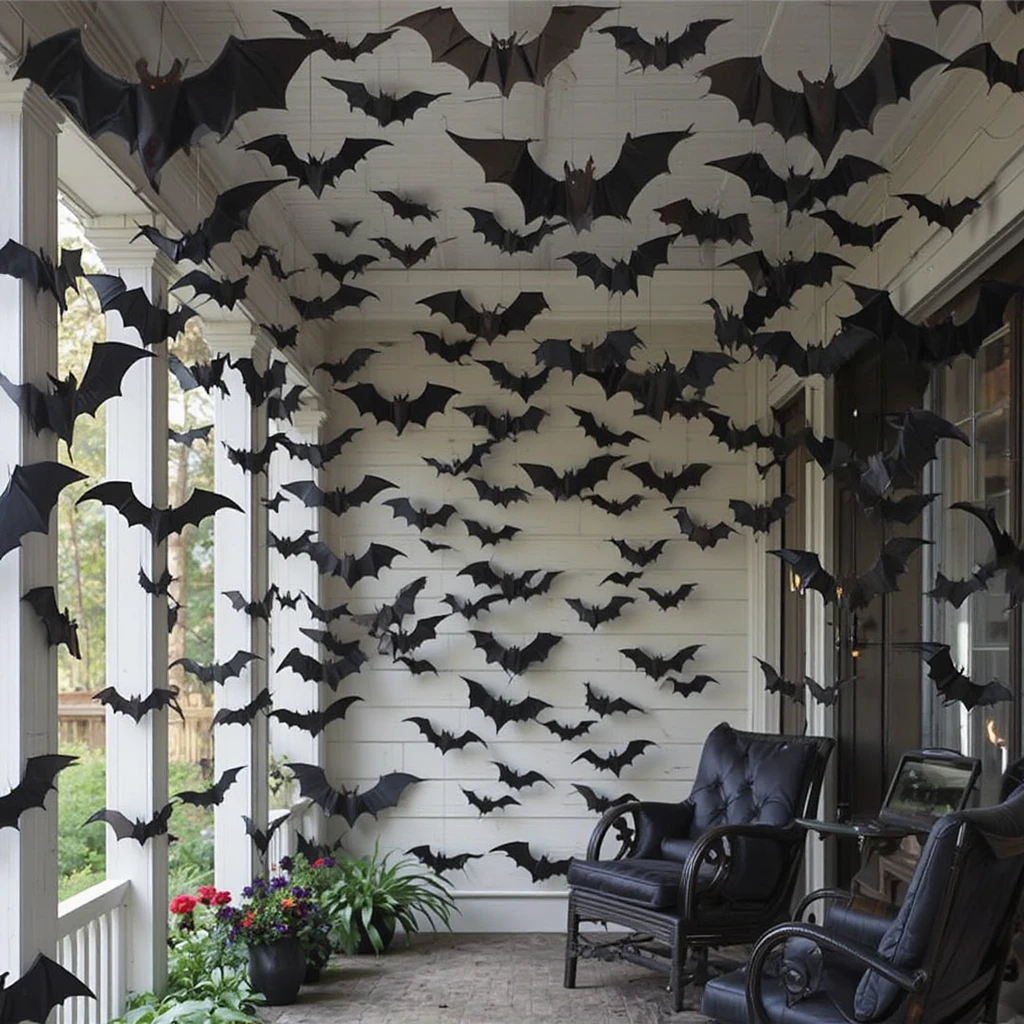
Flying Bat Invasion
Bats remain one of the most iconic Halloween symbols, and they’re incredibly versatile for front porch decorating. Create a dramatic bat swarm effect by cutting various sizes of bat shapes from black cardstock or foam sheets. Arrange them strategically across your porch walls, ceiling, and columns to simulate bats in flight.
For enhanced visual impact, layer the bats at different heights and angles. Some should appear to be swooping down while others fly upward, creating natural movement. This three-dimensional approach adds depth to your Halloween porch decor and makes the display more dynamic and realistic.
Consider using adhesive hooks or removable mounting strips to avoid damaging your porch surfaces. Battery-operated LED lights placed behind clusters of bats can create haunting silhouettes that become even more impressive after dark.
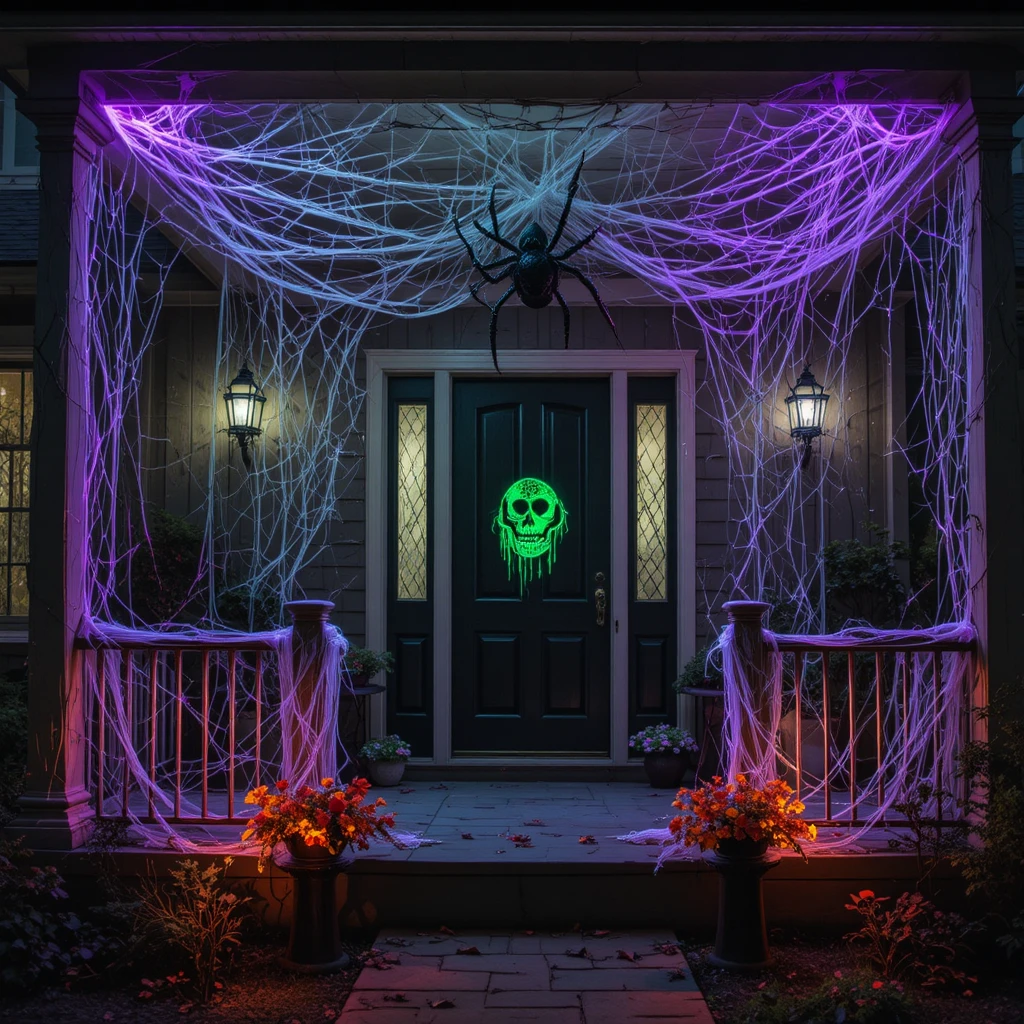
Giant Spider Web Display
Nothing says Halloween quite like massive spider webs stretching across your porch. High-quality synthetic spider webbing can be pulled and stretched across railings, around columns, and between posts to create an abandoned, haunted appearance. The trick is making the webs look authentically tangled and irregular rather than perfectly symmetrical.
Add oversized plastic spiders in strategic locations throughout the webbing. Position them crawling up columns, hanging from doorways, or lurking in corners where they’ll startle visitors. For an extra creepy touch, include egg sacs and smaller baby spiders to suggest a thriving spider colony has taken over your porch.
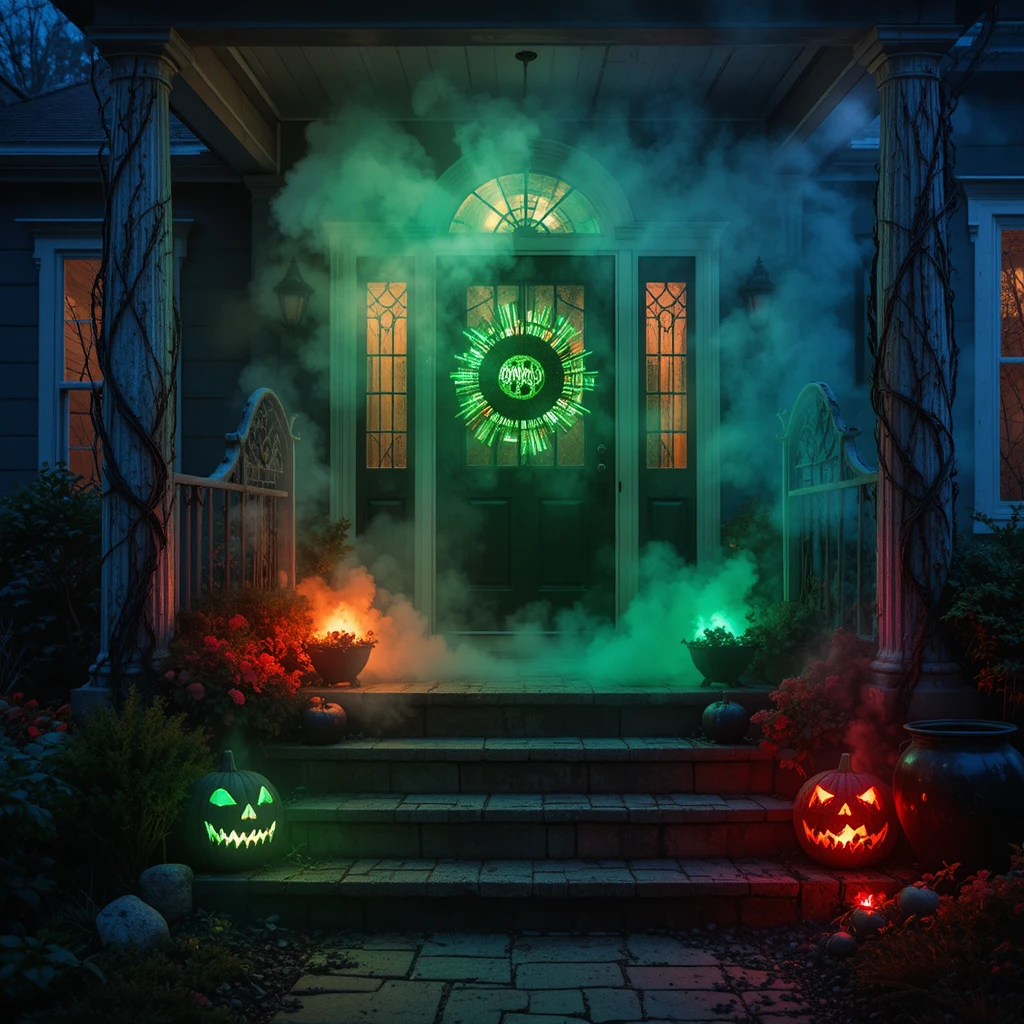
Illuminate your spider webs with purple or green LED spotlights to make them glow eerily at night. This lighting technique highlights the intricate web patterns while creating an otherworldly atmosphere that amplifies the scare factor.
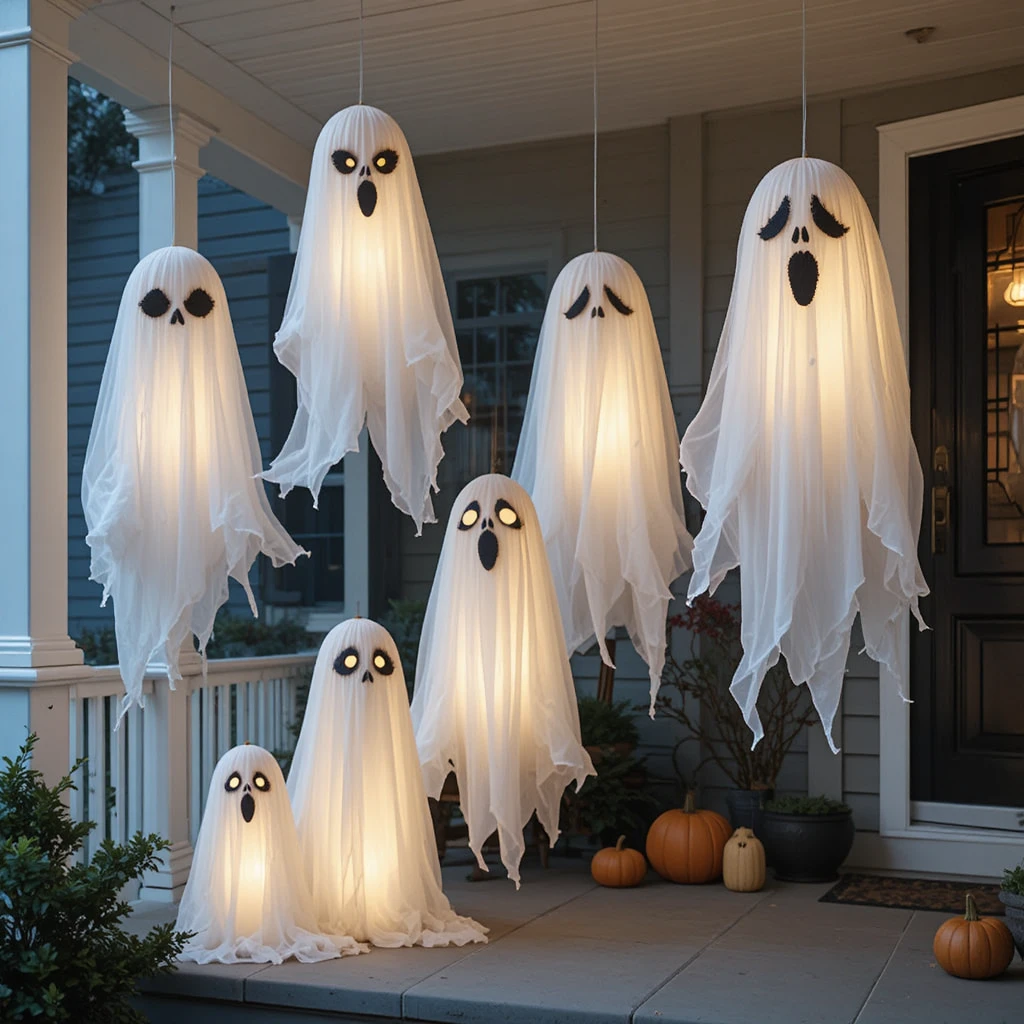
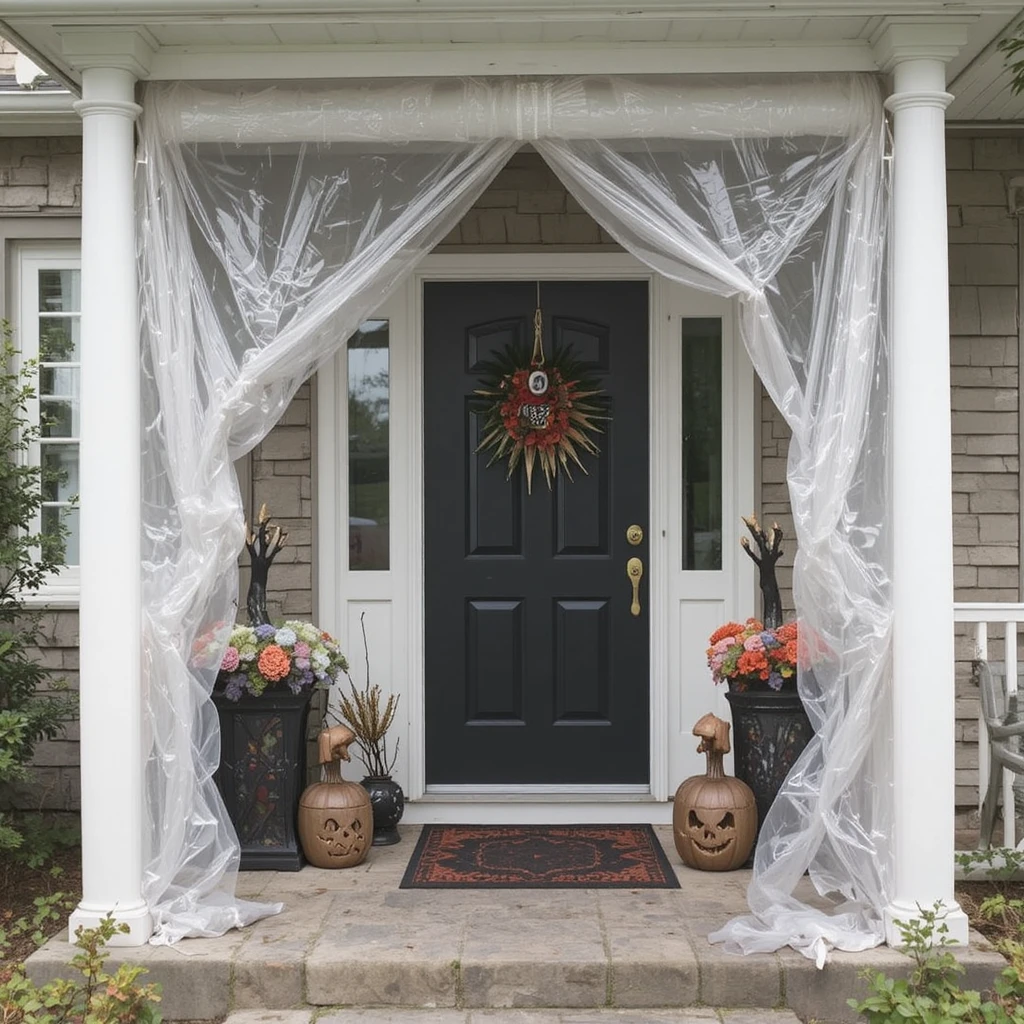
Floating Ghost Figures
Ghosts bring ethereal elegance to any Halloween front porch setup. Create DIY floating ghosts using white cheesecloth or lightweight fabric draped over wire frames or balloons. Add black felt facial features to give each ghost personality—some can look mournful, others menacing, and a few playfully spooky.
Suspend ghosts at varying heights from your porch ceiling using clear fishing line to create the illusion they’re floating freely. When the wind catches them, they’ll sway naturally, enhancing the haunted atmosphere. For nighttime drama, place battery-operated tea lights inside each ghost to create an eerie internal glow.
Consider creating a ghost family scene with different sized specters positioned at various levels. Large ghosts near the entrance make bold statements, while smaller ones tucked near windows or pathways create surprise moments for visitors exploring your Halloween display.
Haunted Structures and Atmospheric Elements
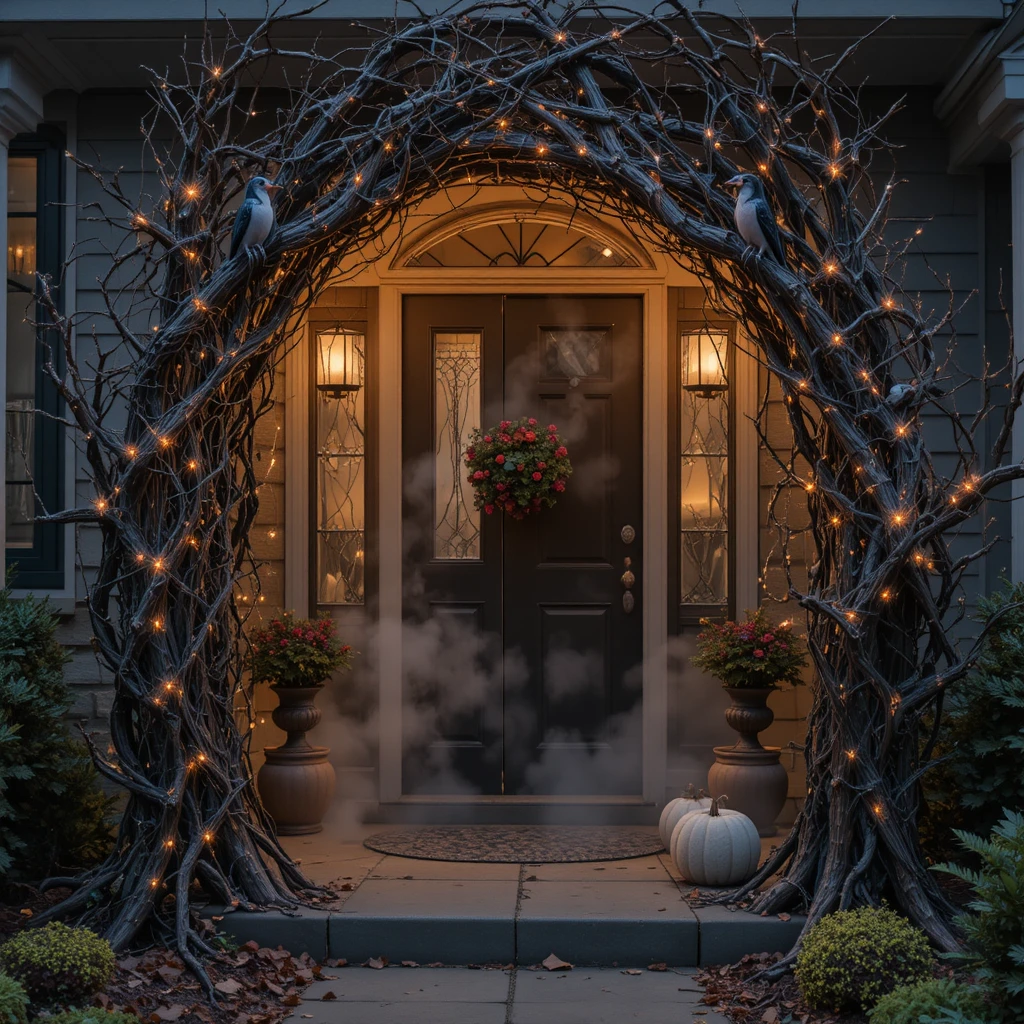
Twisted Branch Archway
Transform your porch entrance with gnarled, twisted branches that evoke an enchanted forest gateway. Collect fallen branches from your yard or purchase artificial ones from craft stores. Arrange them around your doorframe, securing them with wire or zip ties to create an organic archway.
Weave fairy lights through the branches for a magical glow, or add synthetic cobwebs for a more sinister appearance. Dead leaves, faux moss, and small plastic crows perched on branches complete the haunted forest aesthetic. This natural element grounds your Halloween front porch decor while adding impressive visual height.
The branch archway works particularly well when paired with fog machine effects. Low-lying fog creeping through twisted branches creates an atmospheric entrance that looks like something from a horror film.
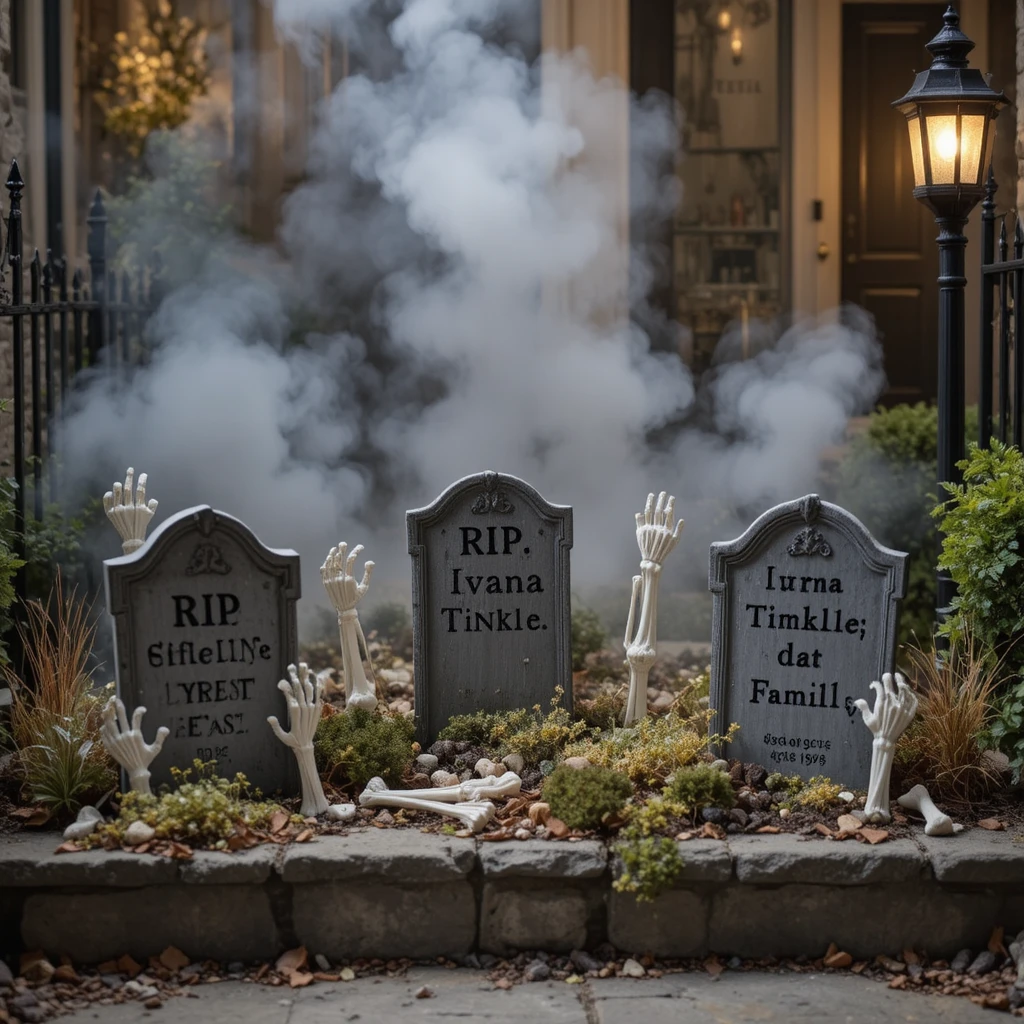
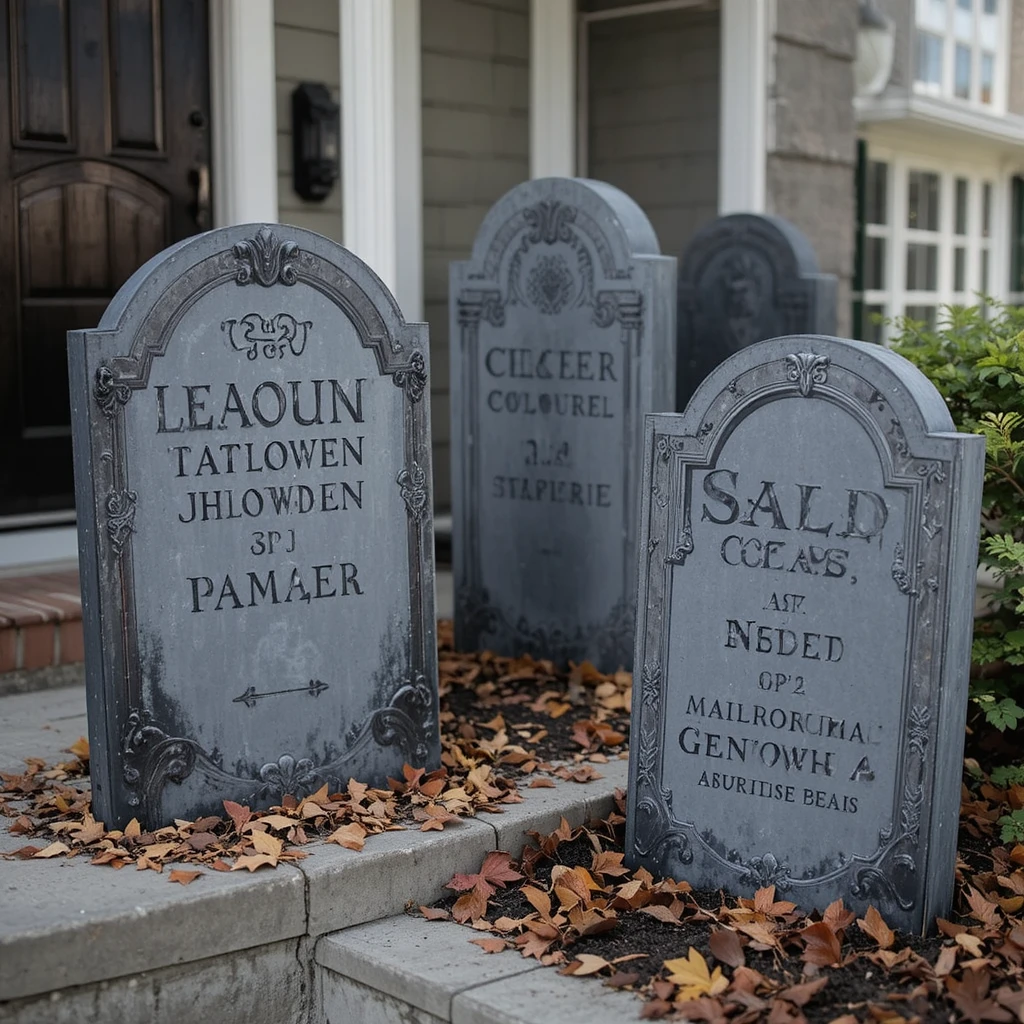
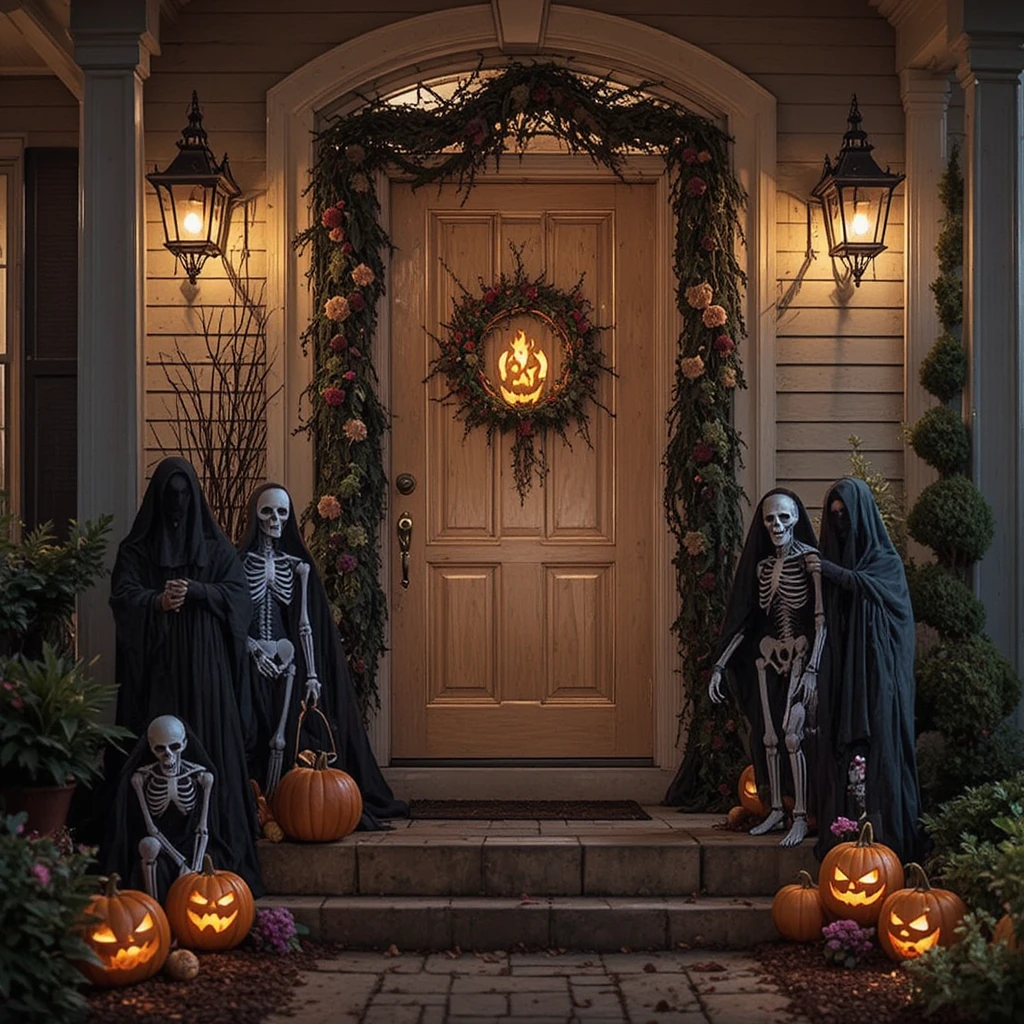
Cemetery Scene Setup
Bring a miniature graveyard to life on your front porch with DIY tombstones crafted from foam insulation boards or thick cardboard. Cut tombstone shapes and paint them gray with weathering effects using black and brown paint for aged stone texture. Add humorous or creepy epitaphs like “RIP Ivana Tinkle” or “Here Lies…” with your family name.
Position tombstones at slight angles, as if they’ve shifted over time. Surround them with plastic skeleton hands emerging from the ground, scattered bones, and artificial dead grass. A fog machine positioned behind the cemetery creates ground fog that rolls dramatically across the display.
Complete your graveyard scene with solar-powered stake lights that cast eerie shadows on the tombstones. Add a vintage lantern or two for Victorian-era cemetery authenticity. This Halloween porch idea works especially well if you have multiple levels or steps to create depth in your graveyard layout.
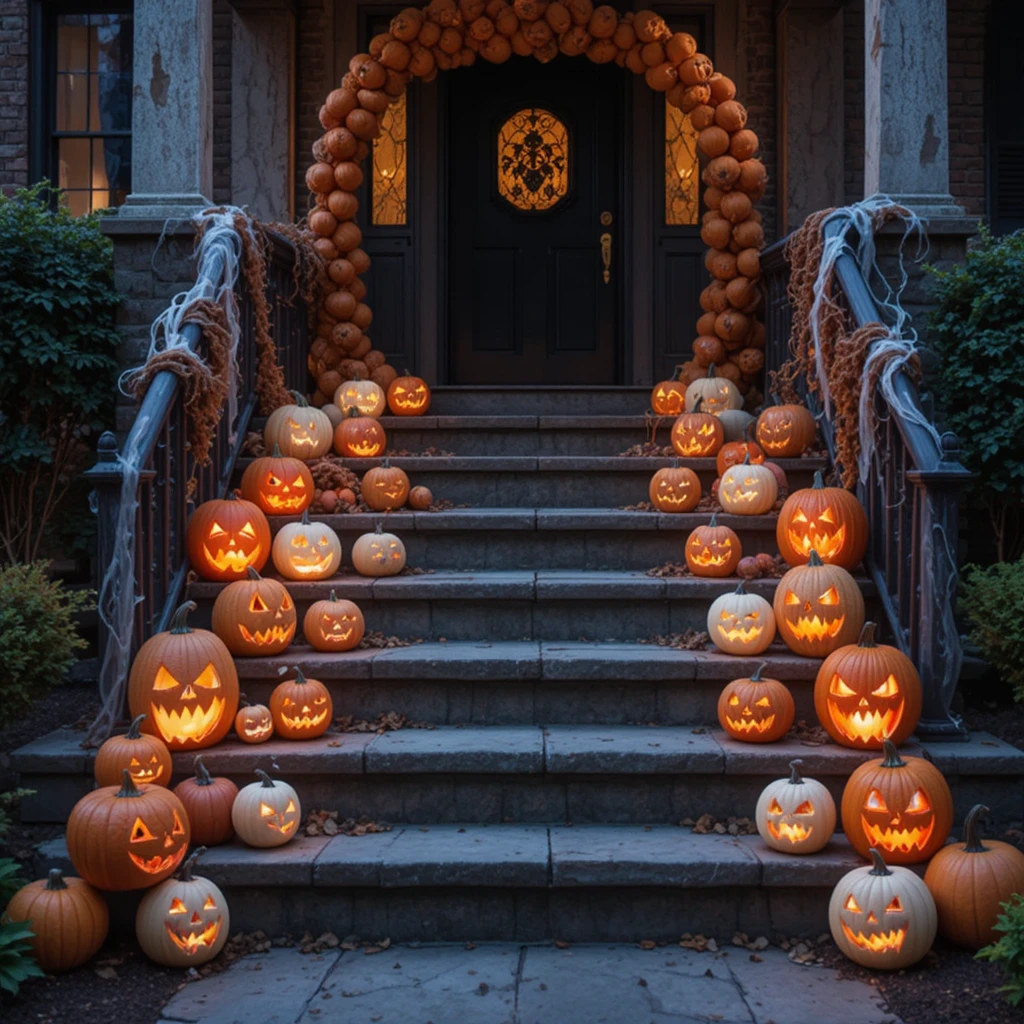
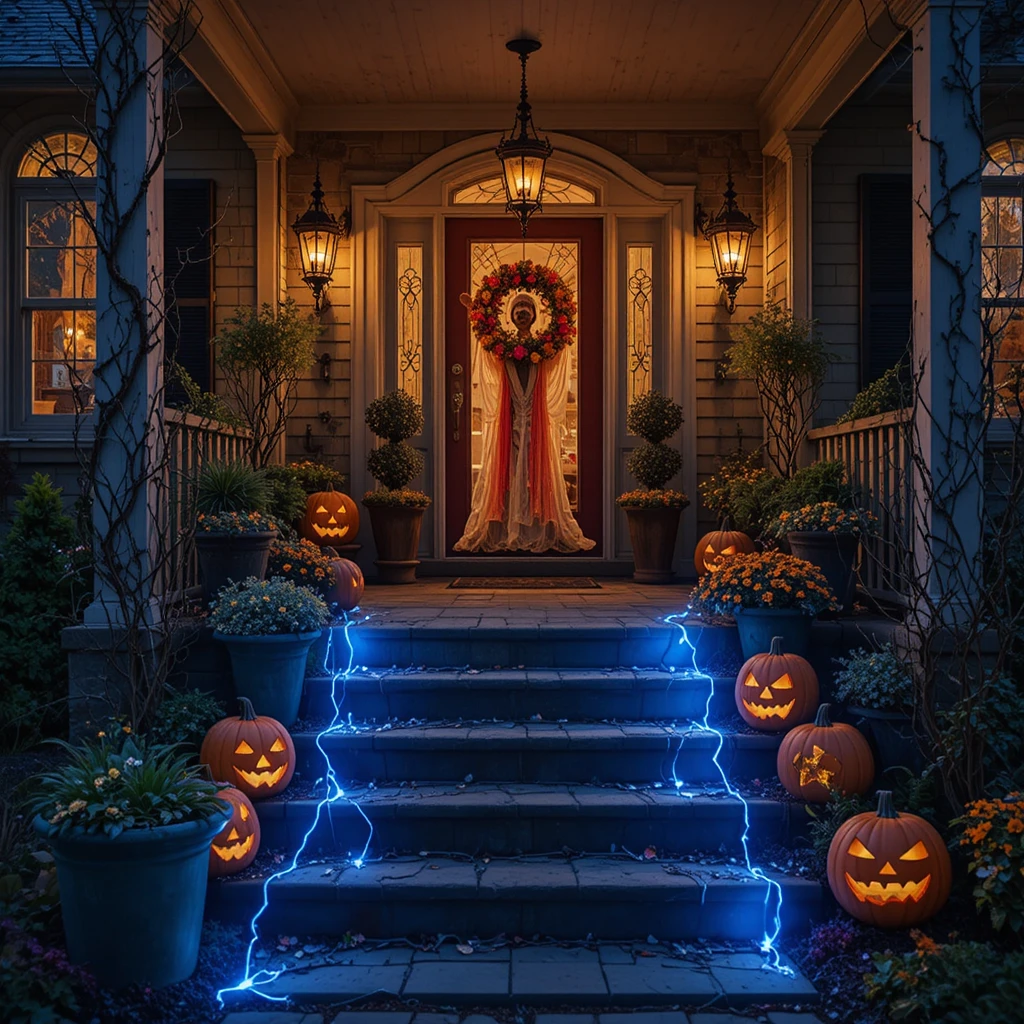
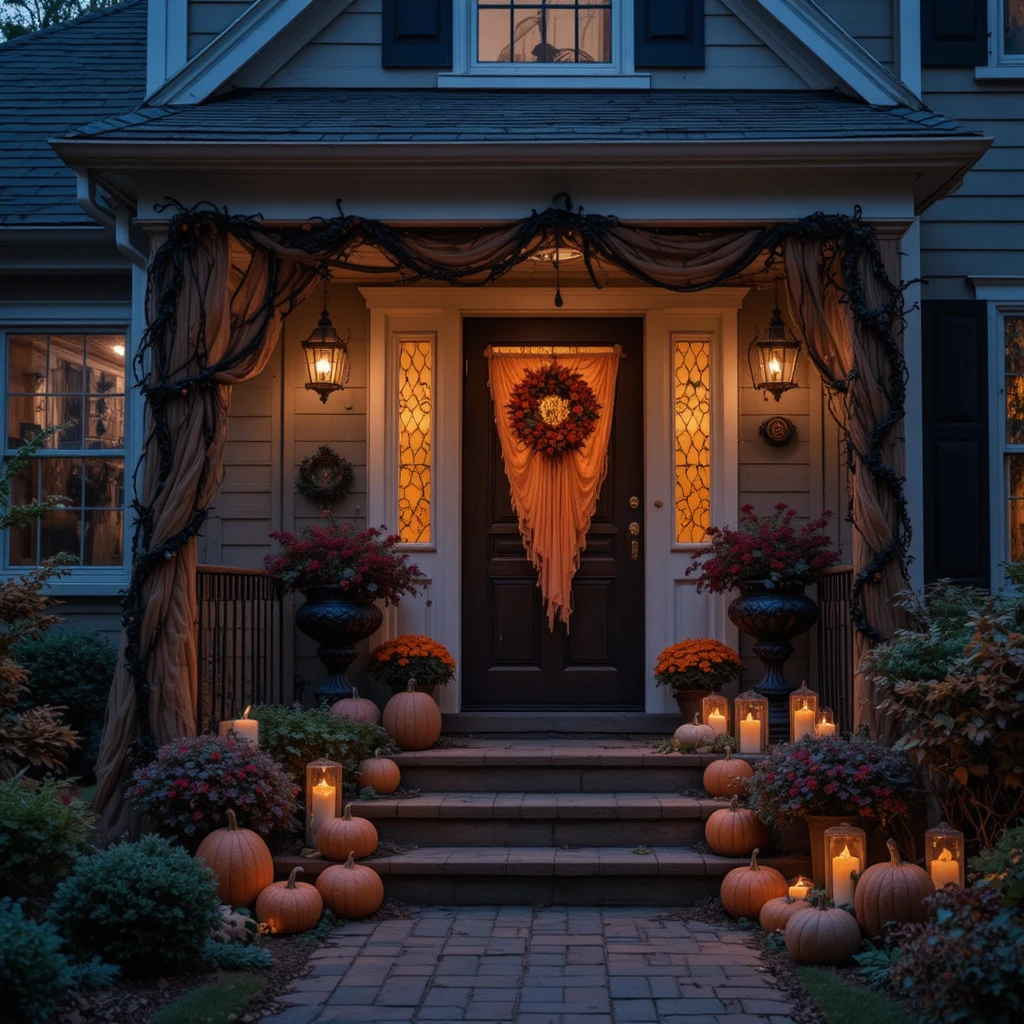
Pumpkin Staircase Display
Line your porch steps with carved jack-o’-lanterns creating a glowing pathway that welcomes visitors while maintaining spooky ambiance. Vary the sizes of your pumpkins and alternate between traditional carved faces and more intricate designs. Mix in white pumpkins with orange ones for visual interest and sophistication.
For safety and longevity, use battery-operated LED candles inside your pumpkins instead of real flames. These create the same flickering effect without fire hazards or the mess of wax. Modern LED options even come with remote controls, allowing you to time your display perfectly.
Consider creating a pumpkin arch over your doorway using faux pumpkins attached to a lightweight frame. This showstopping element becomes a focal point that photographs beautifully and creates a magical transition between the outside world and your haunted entrance.
Wicked Characters and Halloween Icons
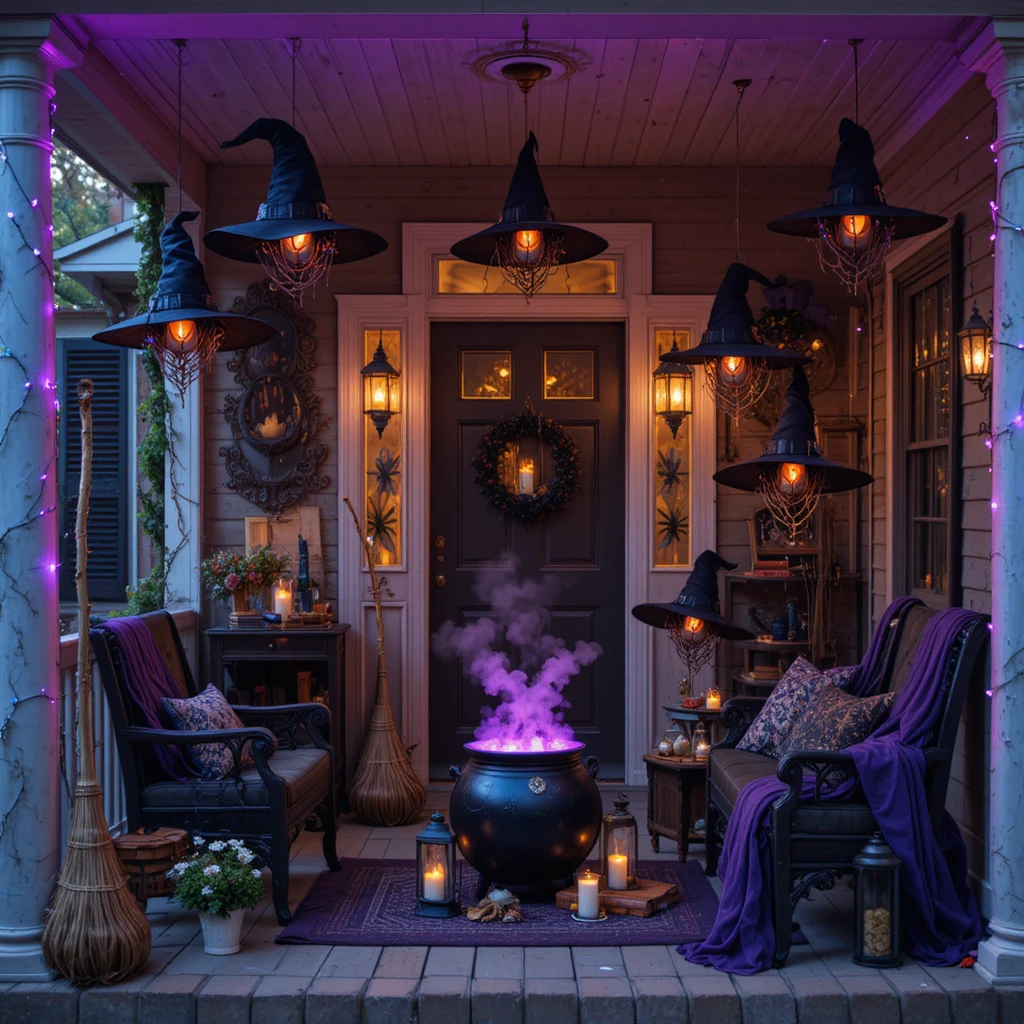
Witch’s Gathering Scene
Create a witches’ coven on your front porch with strategically placed witch hats that appear to float in mid-air. Hang black pointed hats at various heights using clear fishing line attached to your porch ceiling. Place battery tea lights inside hats for an enchanted glow after dark.
Accompany floating hats with witch accessories like broomsticks propped against railings, a bubbling cauldron (with fog machine effects), and potion bottles filled with colored water. Drape purple or deep green fabric across furniture to suggest a witch’s workshop. Add spell books, vintage lanterns, and crystal balls for mystical atmosphere.
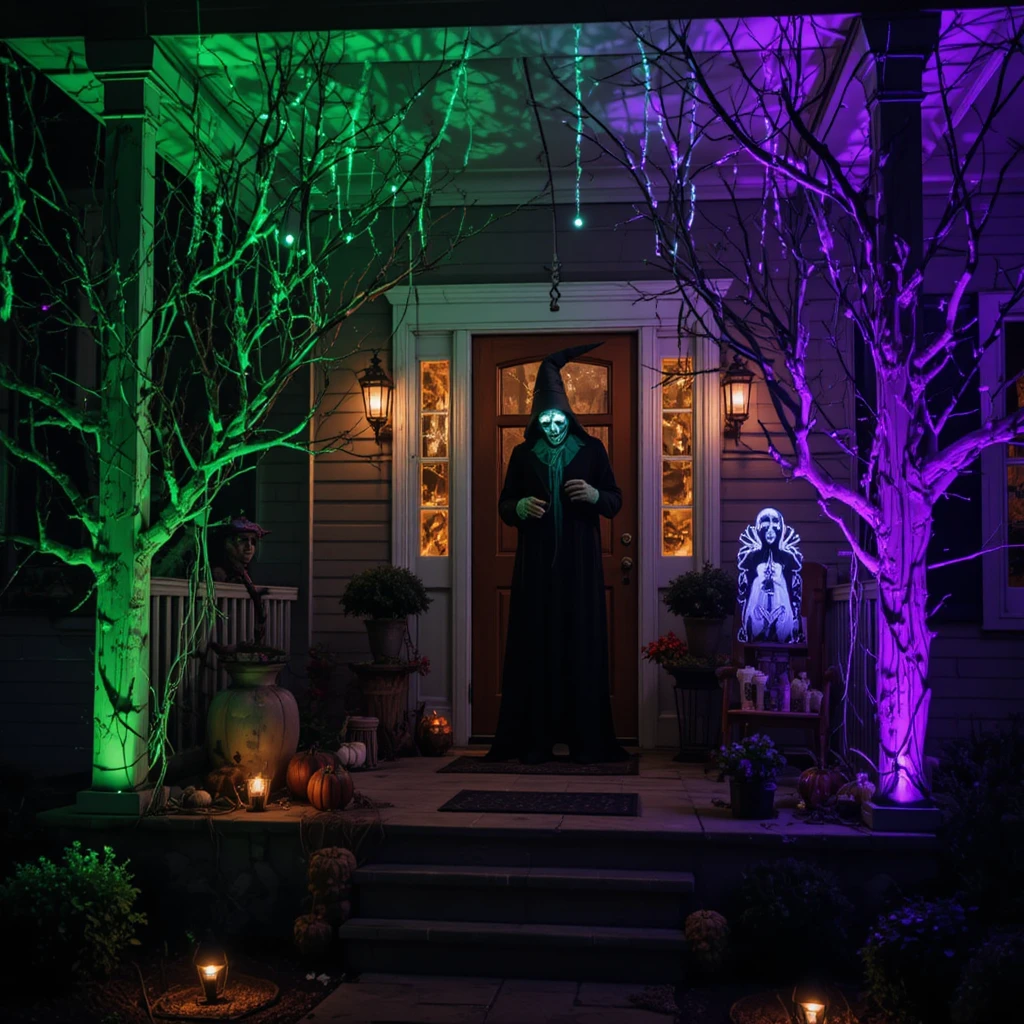
Purple lighting works exceptionally well for witch-themed decorations, instantly transforming your porch into something mysterious and magical. String purple LED lights along railings or use purple bulbs in existing porch fixtures to bathe everything in supernatural light.
Sinister Scarecrow Guard
Position menacing scarecrows as unsettling sentinels on your Halloween front porch. Create DIY scarecrows using old clothes stuffed with straw or newspaper, adding creepy masks or burlap faces with stitched features. Pose them in unexpected ways—sitting in rocking chairs, standing guard by doorways, or appearing to peer through windows.
For maximum impact, give your scarecrows backstories. Perhaps they’re cursed guardians or former trick-or-treaters who stayed too long. Add weathered signs explaining their presence: “Beware the Scarecrow’s Curse” or “Trespassers Become Scarecrows.”
Illuminate scarecrows with uplighting to cast dramatic shadows and create an ominous silhouette effect. Motion-activated sound effects like creaking or whispered warnings can make your scarecrow display interactive and memorable.

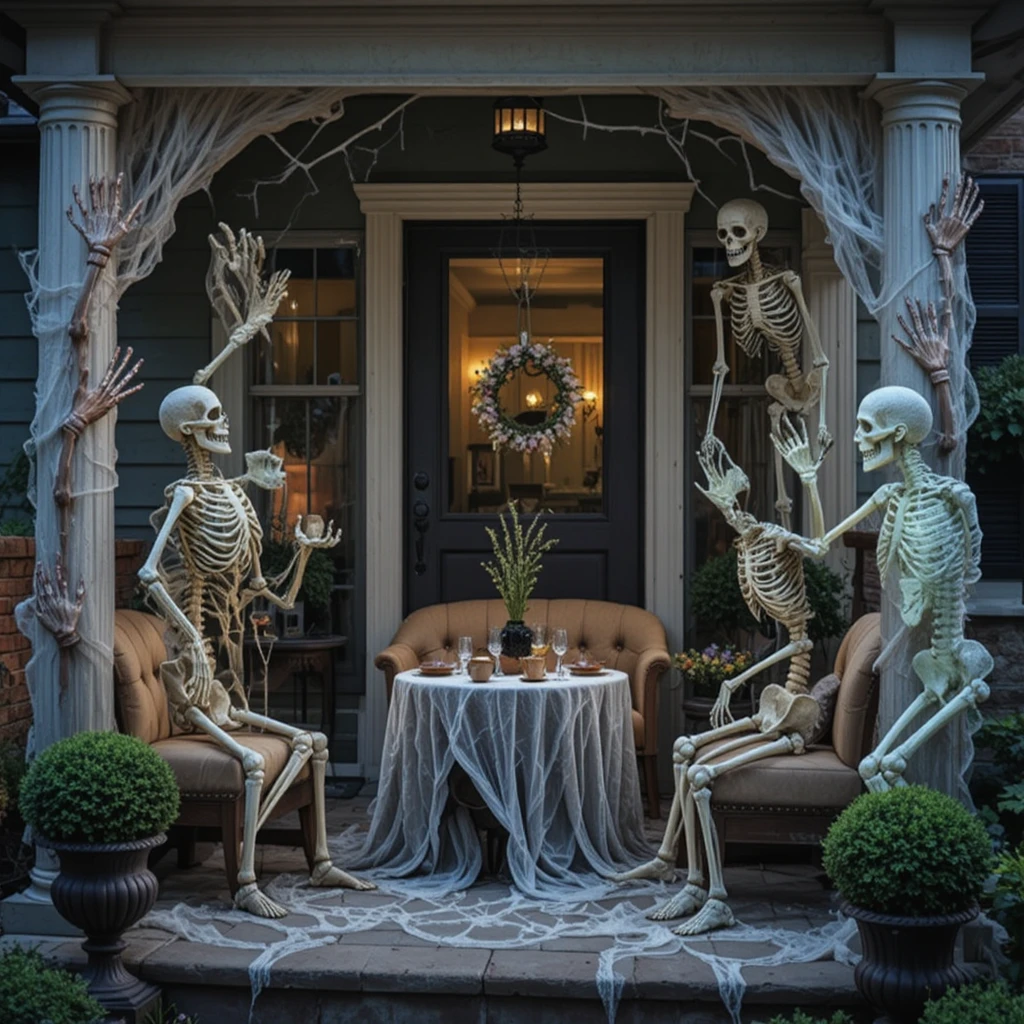
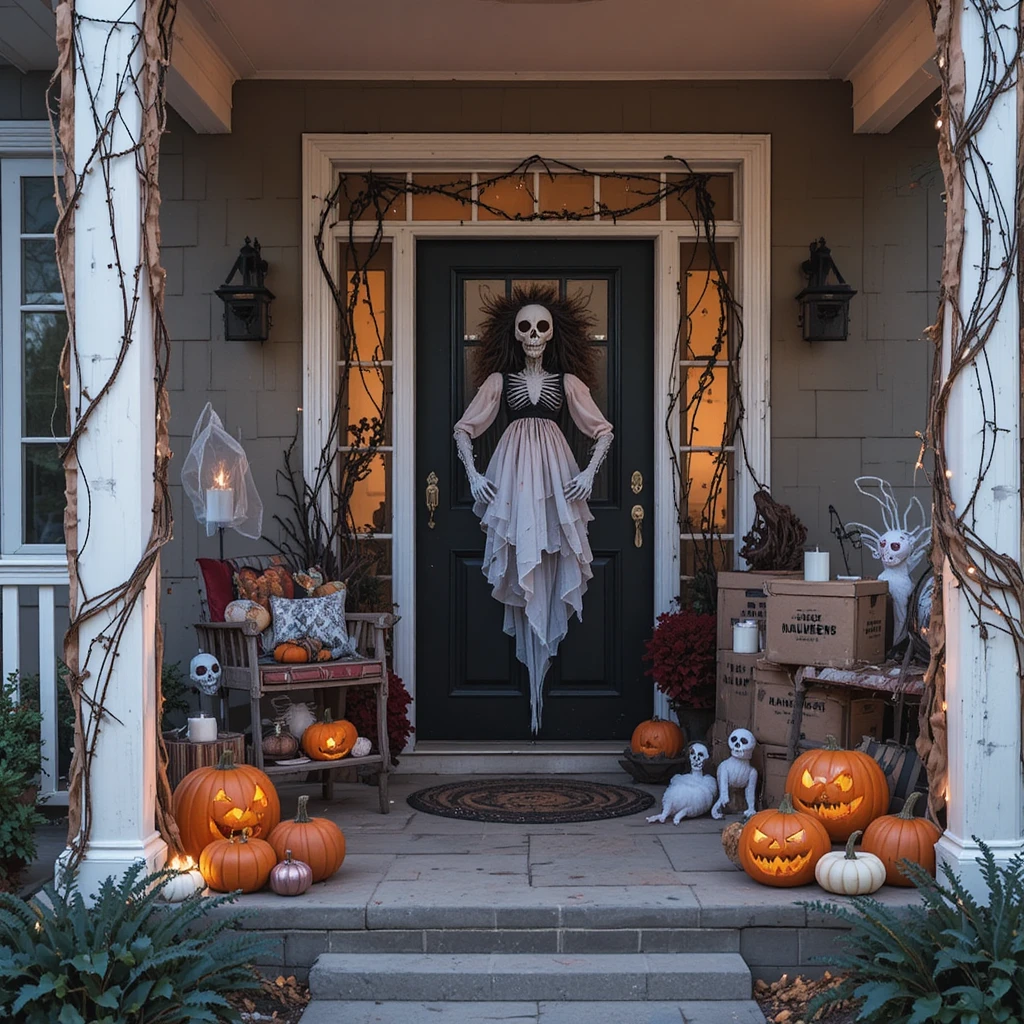
Skeleton Scenarios
Skeletons offer endless creative possibilities for scary Halloween front porch decor. Move beyond simply standing them in corners—create elaborate scenarios that tell stories. Pose skeletons having a tea party with cobweb-covered teacups, climbing porch columns as if escaping from underground, or peeking out from behind furniture.
Full-size poseable skeletons are investment pieces that can be reconfigured each year for fresh displays. Add skeletal pets like dogs or cats, and include smaller skeleton hands emerging from planters or poking through railings. Paint some bones with glow-in-the-dark paint for an extra spooky nighttime effect.
Consider creating a skeleton family scene with different sized skeletons positioned as if they’re the undead version of your household. This personalized touch adds humor while maintaining the creepy Halloween atmosphere visitors expect.
Lighting Techniques for Maximum Scare Factor
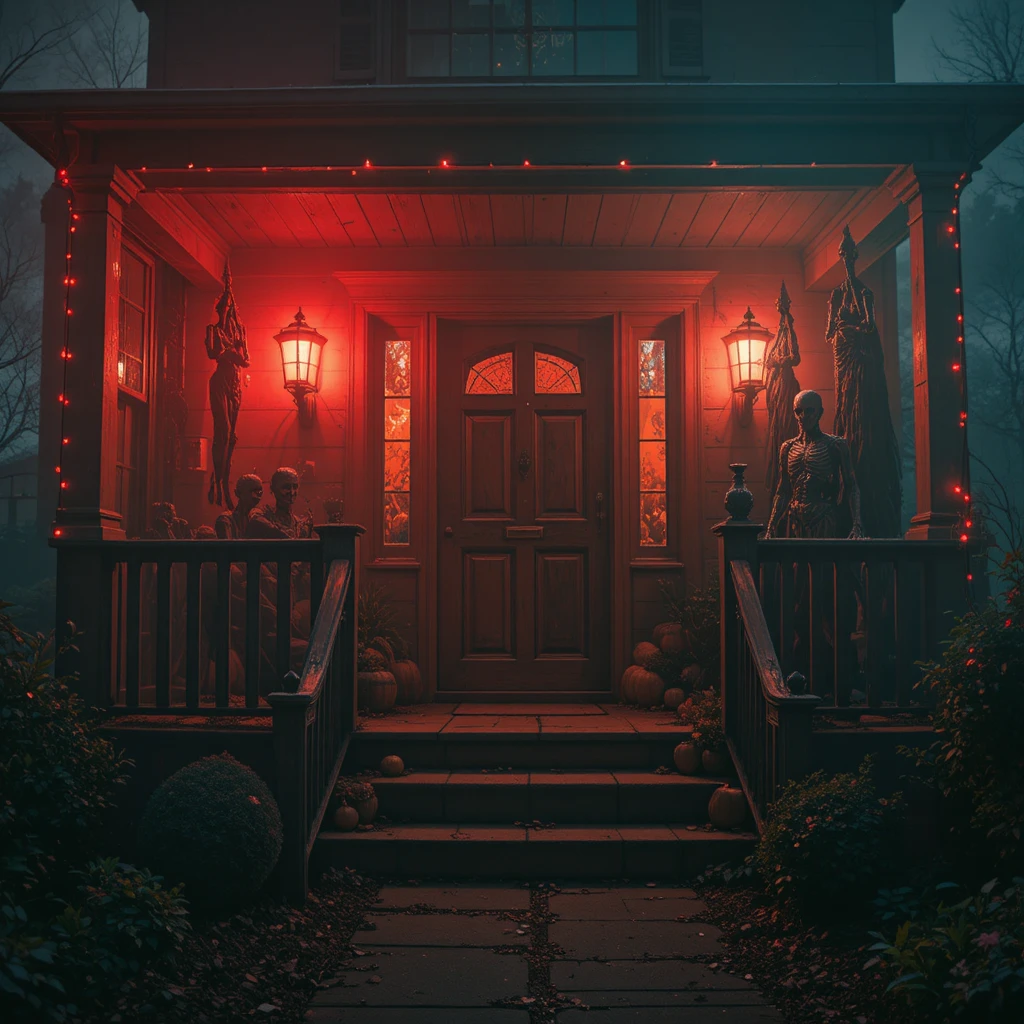
Strategic Red Lighting
Red lights instantly transform any Halloween front porch into something sinister. Replace standard bulbs with red ones in existing porch fixtures, or add red LED string lights along railings and around doorframes. Red lighting suggests danger, blood, and horror film aesthetics that immediately unsettle visitors.
Use red spotlights to highlight specific decorations like tombstones, skeletons, or hanging bodies. The dramatic shadows cast by red lighting create depth and dimension that white lights can’t achieve. Position lights low to cast shadows upward for the most unsettling effects.
Combine red lights with fog for a hellish atmosphere that looks particularly impressive in photos and videos. Alternate between red and orange lights to suggest flames without actual fire hazards.
Dramatic Uplighting
Uplighting—positioning lights to shine upward from ground level—creates unnatural shadows that our brains instinctively recognize as threatening. Place LED spotlights at the base of decorations, trees, or architectural features to cast eerie shadows across your porch ceiling and walls.
Green uplighting makes faces look ghastly and sickly, perfect for zombie or witch displays. Purple creates mysterious supernatural ambiance, while white or blue suggests ghostly presence. Experiment with colored bulbs to find the combination that creates your desired scary atmosphere.
Battery-operated LED spotlights are affordable and don’t require electrical outlets, making them easy to position anywhere on your front porch. Use them to highlight focal points and create layers of light and shadow throughout your display.
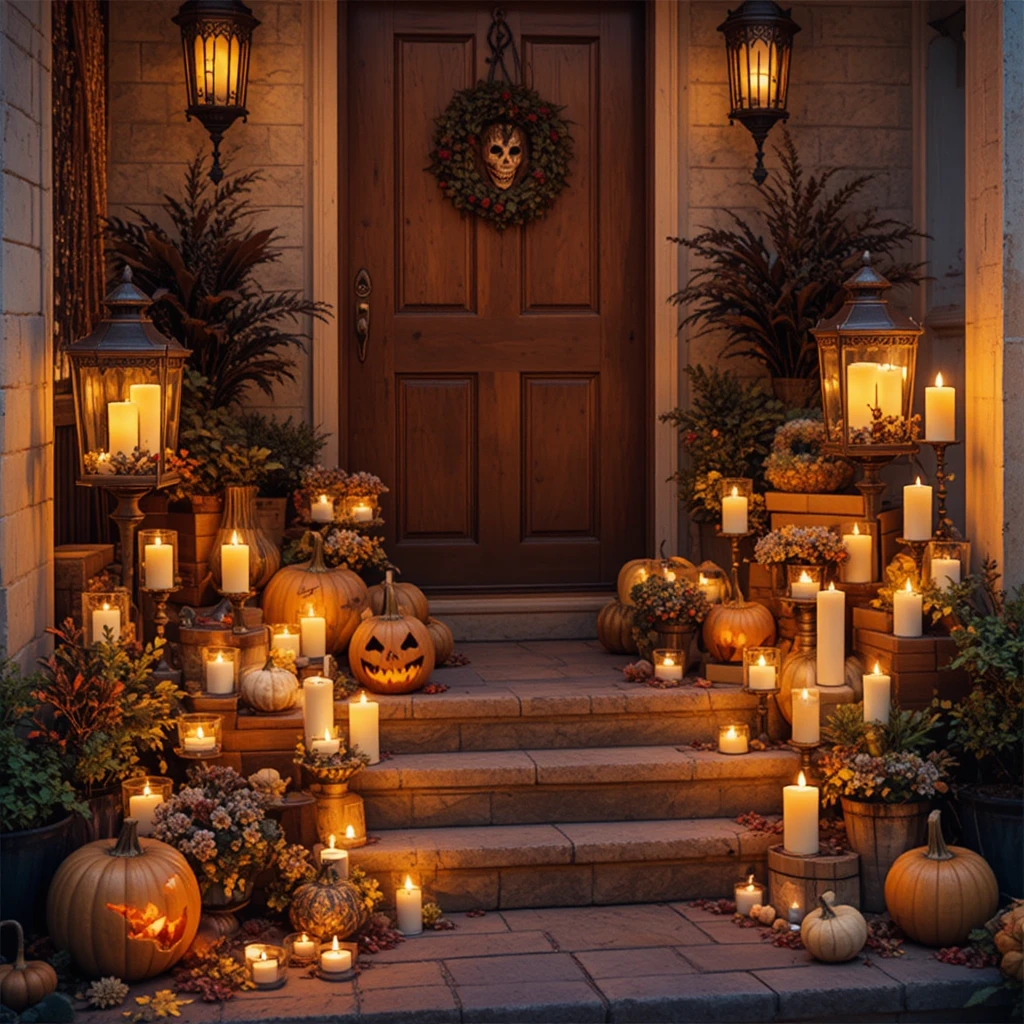
Flickering Candle Effects
Recreate the ambiance of haunted candlelight using flameless LED candles with realistic flickering effects. Place them in vintage lanterns, inside carved pumpkins, within decorative candelabras, or scattered throughout your display. The irregular flickering mimics real flames while remaining completely safe.
Cluster candles at different heights using candlesticks, books, or decorative boxes as risers. This creates visual interest and makes your Halloween porch look more elaborate. Choose candles in various sizes to avoid a uniform appearance that looks too artificial.
Timer-enabled LED candles allow you to automate your display, ensuring your porch looks spooky from dusk until midnight without manually turning decorations on and off. This convenience is especially valuable during the busy Halloween season.
Budget-Friendly DIY Halloween Front Porch Projects
Painted Cardboard Tombstones
Create professional-looking tombstones from cardboard boxes for mere pennies. Cut tombstone shapes from flattened boxes, paint them gray, and add weathering effects with black and brown paint sponged randomly. Use a marker to add epitaphs, cracks, and stone texture details.
For durability, coat cardboard tombstones with exterior sealant or cover them with clear packing tape. This weatherproofing allows them to withstand light rain and dew, extending their usability throughout the Halloween season. Store them flat after Halloween for years of reuse.
Stand tombstones upright by attaching them to wooden stakes driven into the ground, or lean them against porch railings and furniture. Surround with faux autumn leaves and plastic bones for a complete cemetery scene without expensive pre-made decorations.
Paper Bat Swarm
Black construction paper or cardstock transforms into dozens of bats with minimal effort. Print or draw bat templates in various sizes, cut them out, and attach to walls, ceilings, and columns using removable adhesive putty. Create the illusion of motion by positioning bats in swirling patterns.
For added dimension, fold bat wings slightly forward before attaching them to surfaces. This creates shadows and makes the bats appear more three-dimensional. Hang some bats from ceiling with fishing line at different heights for even more dynamic visual interest.
The beauty of paper bats is their versatility—rearrange them throughout the season, take them down easily without damage, and store flat for next year. A single afternoon craft session can produce enough bats to cover an entire porch dramatically.
Milk Jug Ghosts
Empty plastic milk jugs become charming ghost luminaries with just a permanent marker and LED tea lights. Draw simple ghost faces on clean jugs, insert battery-operated lights, and line them along walkways, steps, or porch railings. Their soft glow creates welcoming yet spooky pathway lighting.
For stability on windy nights, add sand or pebbles to the bottom of each jug before inserting lights. This extra weight prevents them from toppling while still allowing light to shine through. Group ghosts in clusters of odd numbers (3, 5, or 7) for most visually appealing arrangements.
Customize your milk jug ghosts with different expressions—happy, sad, surprised, or scary. Mix sizes using gallon jugs and smaller containers for variety. This incredibly affordable project works perfectly for family crafting sessions and creates memorable Halloween decorations.

Advanced Halloween Porch Decoration Techniques
Layered Texture Approach
The most impressive Halloween front porches combine multiple texture layers. Start with a foundation of fabric—drape black tablecloths over furniture, hang tattered gauze curtains, or cover railings with burlap. Add dimensional elements like twisted branches, pumpkins, and lanterns. Finally, top with delicate details such as spider webs, scattered autumn leaves, and small accent pieces.
This layering creates depth that makes your porch look professionally decorated rather than simply cluttered with random items. Choose a cohesive color palette (black, orange, and purple, or black, white, and silver) and stick to it consistently throughout your display.
Vary the heights of decorations by using pedestals, stacked crates, or hanging elements. This prevents everything from existing at the same eye level, which can appear flat and uninteresting in photographs. Create distinct zones on your porch—a seating area, a focal wall, a cemetery section—each with its own mini-story.
Motion-Activated Elements
Technology elevates Halloween decorations from static displays to interactive experiences. Motion-activated sound effects—creaking doors, ghostly moans, cackling witches, or sudden screams—startle visitors in delightfully spooky ways. Position sensors strategically to trigger at optimal moments as people approach your door.
Animatronic figures add movement that captures attention and creates memorable scares. Even affordable options like motion-activated jumping spiders or nodding skeletons significantly increase your display’s impact. Place them where visitors won’t see them until they’re close enough for maximum surprise.
Combine motion sensors with lighting effects for theatrical drama. Lights that suddenly illuminate specific decorations or strobe effects coordinated with sound create cinematic quality haunting that visitors will remember long after Halloween ends.
Fog Machine Integration
Professional-quality fog machines are surprisingly affordable and transform ordinary decorations into movie-set atmospheres. Position your fog machine behind cemetery displays, under porch steps, or near entryways so fog rolls across your porch at ground level.
For best results, use fog machines during cooler evening hours when temperature and humidity help fog linger longer. Test your machine before Halloween night to find optimal positioning and determine how frequently to run it without overwhelming your display.
Combine fog with strategic lighting—uplighting through fog creates dramatic beams, while colored lights (green, red, or purple) tint the fog for extra atmospheric effect. Add fog-friendly decorations like cemetery scenes, cauldrons, or swamp-inspired elements that naturally suit misty environments.
Safety Considerations for Halloween Porch Decorations
Pathway Visibility
While creating scary ambiance is important, ensuring trick-or-treaters can navigate safely should be your top priority. Keep walkways clear of tripping hazards, secure all electrical cords with tape or cord covers, and provide adequate lighting along paths even while maintaining spooky atmosphere.
Use solar-powered stake lights along pathways, or line steps with illuminated pumpkins to guide visitors safely. Mark any level changes or steps clearly with lights or reflective tape. Test your pathway lighting at night before Halloween to ensure it provides sufficient visibility.
Avoid decorations that protrude into walking spaces where they could catch clothing or cause falls. Position animated or motion-activated decorations away from main traffic flow to prevent accidental collisions when they surprise visitors.
Weather-Resistant Materials
Outdoor Halloween decorations must withstand various weather conditions. Choose or create decorations from materials that tolerate moisture—plastic, treated fabric, waterproof paint, and weather-resistant synthetics. Bring delicate items inside during storms or heavy rain.
Secure lightweight decorations that could blow away in wind. Use fishing weights, sandbags, or stakes to anchor displays. Test your setup on a breezy day before Halloween to identify any items needing additional securing.
For electrical decorations, use outdoor-rated extension cords and GFCI-protected outlets. Keep electrical connections elevated off the ground and protected from moisture. Battery-operated decorations eliminate many weather-related electrical concerns while offering greater positioning flexibility.
Fire Safety
Never leave real candles unattended in decorations, especially around fabric, paper, or dried materials. LED flameless candles provide the same atmospheric flickering effect without any fire risk. Modern LED options look remarkably realistic and come in various sizes suitable for all decoration types.
Keep decorations away from heat sources including porch lights that generate significant heat. Maintain clear zones around doorways for emergency access. Avoid blocking windows or security lights with decorations that could hinder visibility or emergency response.
Check all electrical decorations for damaged cords, frayed wires, or broken components before installing. Replace rather than repair damaged items. Never overload electrical outlets—distribute your decorations across multiple circuits if necessary.
Themed Halloween Front Porch Design Concepts
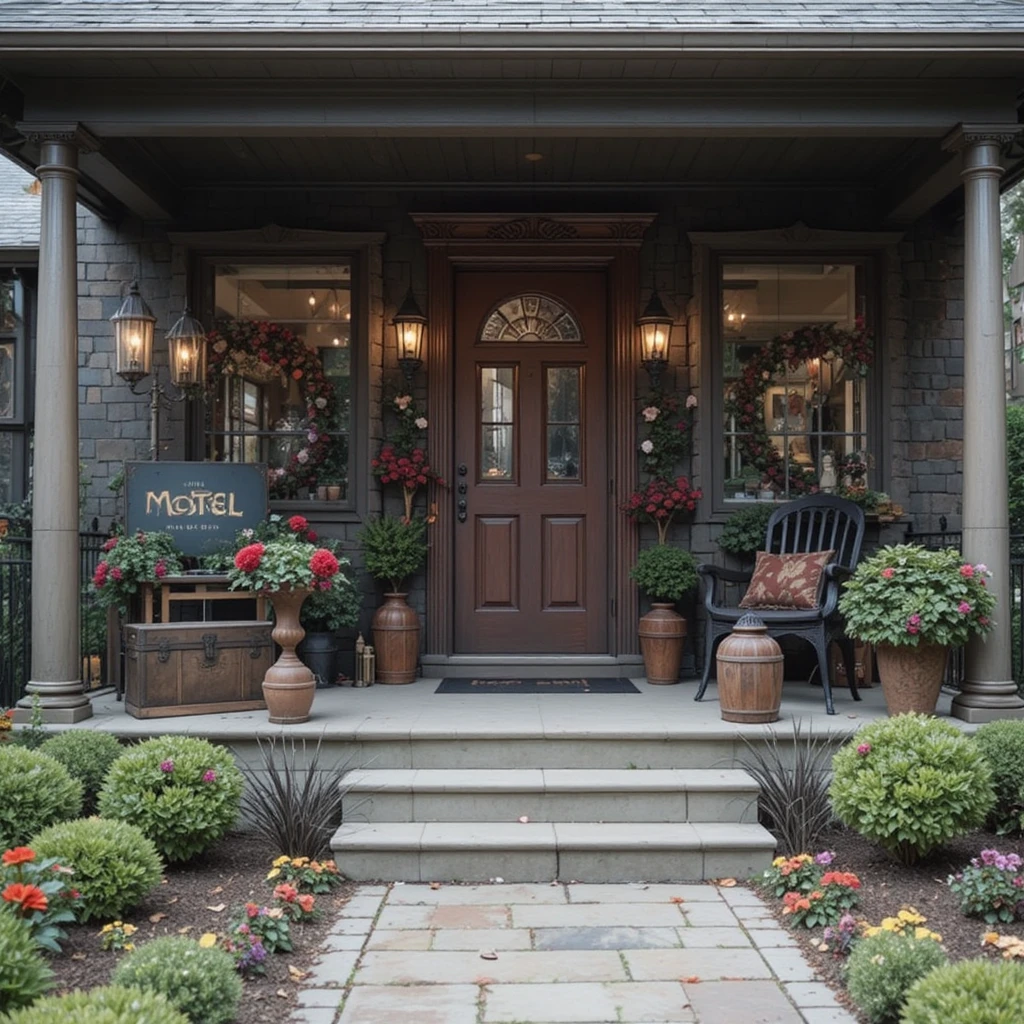
Classic Horror Movie Inspiration
Draw inspiration from iconic horror films to create themed displays that enthusiasts will recognize and appreciate. A Psycho-themed porch might feature a vintage motel sign, old suitcase, and appropriate period lighting. Addams Family inspiration could include gothic candelabras, elegant black roses, and Victorian furniture.
IT-themed decorations might incorporate red balloons, storm drain imagery, and circus elements. The Texas Chainsaw Massacre aesthetic could feature rusted tools, weathered wood, and southwestern details. Keep movie references tasteful and avoid excessive gore that might frighten young children.
Combine movie-inspired elements with traditional Halloween decorations to create displays that work for horror fans while remaining appropriate for family neighborhoods. Use subtle references rather than literal recreations to spark recognition without overwhelming visitors unfamiliar with the films.
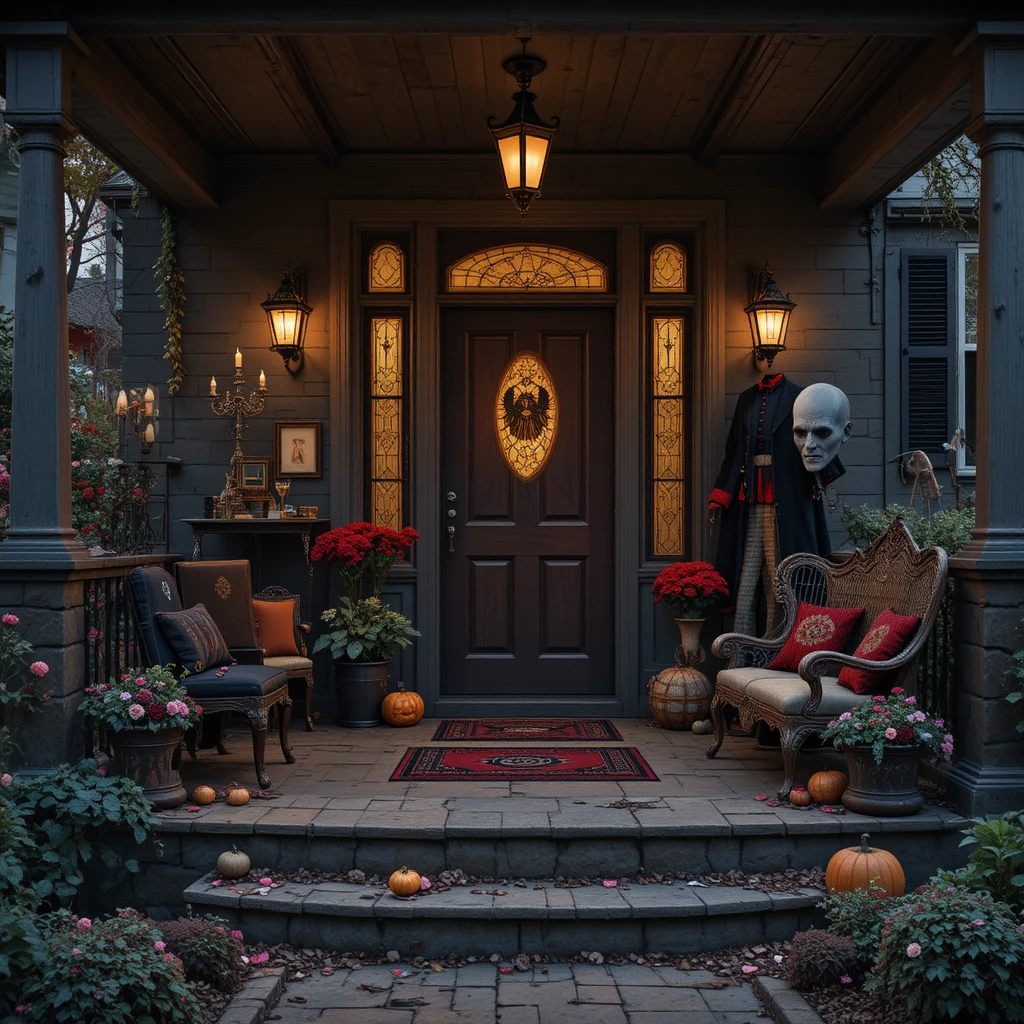
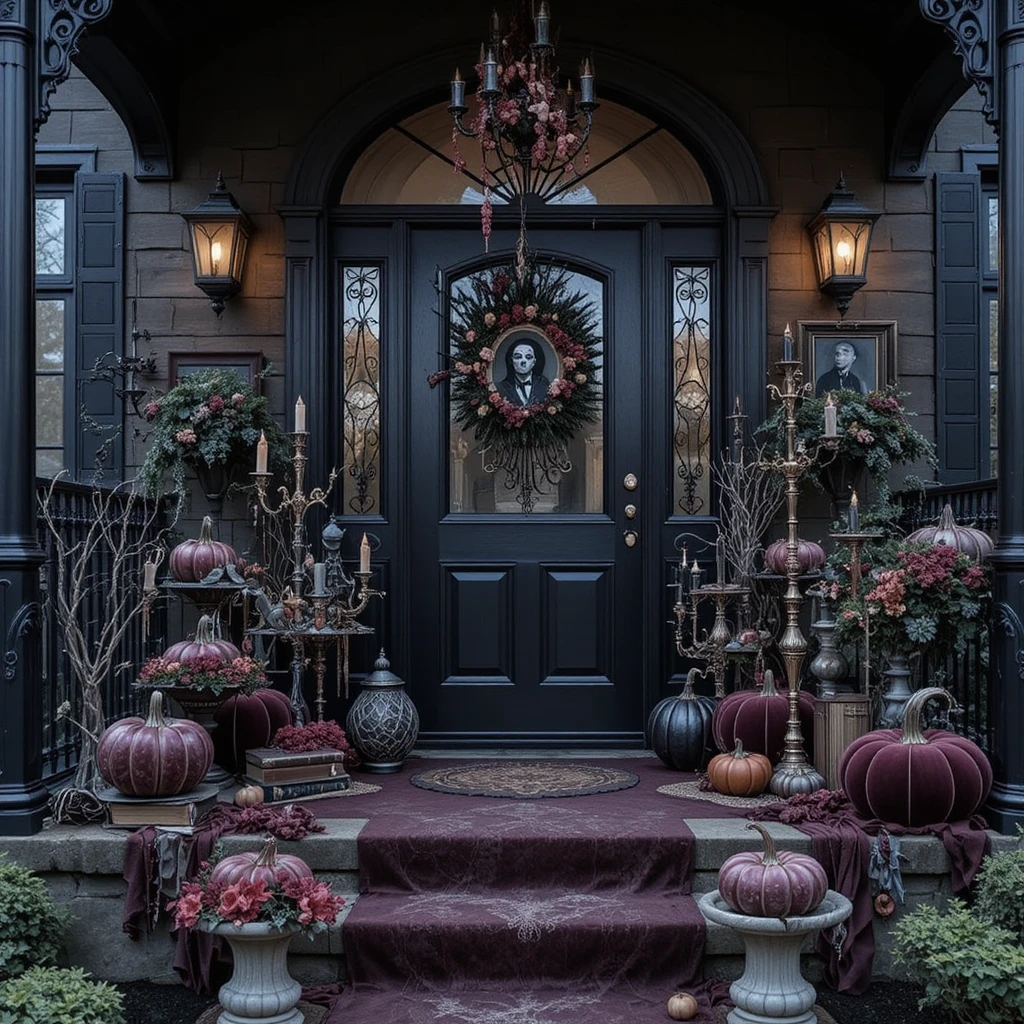
Victorian Gothic Elegance
Sophisticated Halloween enthusiasts appreciate Victorian Gothic aesthetic—elegant yet undeniably spooky. Focus on rich textures: velvet pumpkins, ornate candelabras, antique-style lanterns, and elaborate wrought iron pieces. Choose a refined color palette of black, burgundy, deep purple, and metallic gold.
Add vintage-inspired elements like old books, apothecary bottles, skeleton keys, and framed portraits with eyes that seem to follow visitors. Lace doilies, crystal accents, and tarnished silver create atmosphere that’s haunting without being cartoonish.
This theme works particularly well for porches with traditional architecture. The juxtaposition of elegant materials with Halloween imagery creates sophisticated scary ambiance that appeals to adult tastes while remaining accessible for family celebrations.
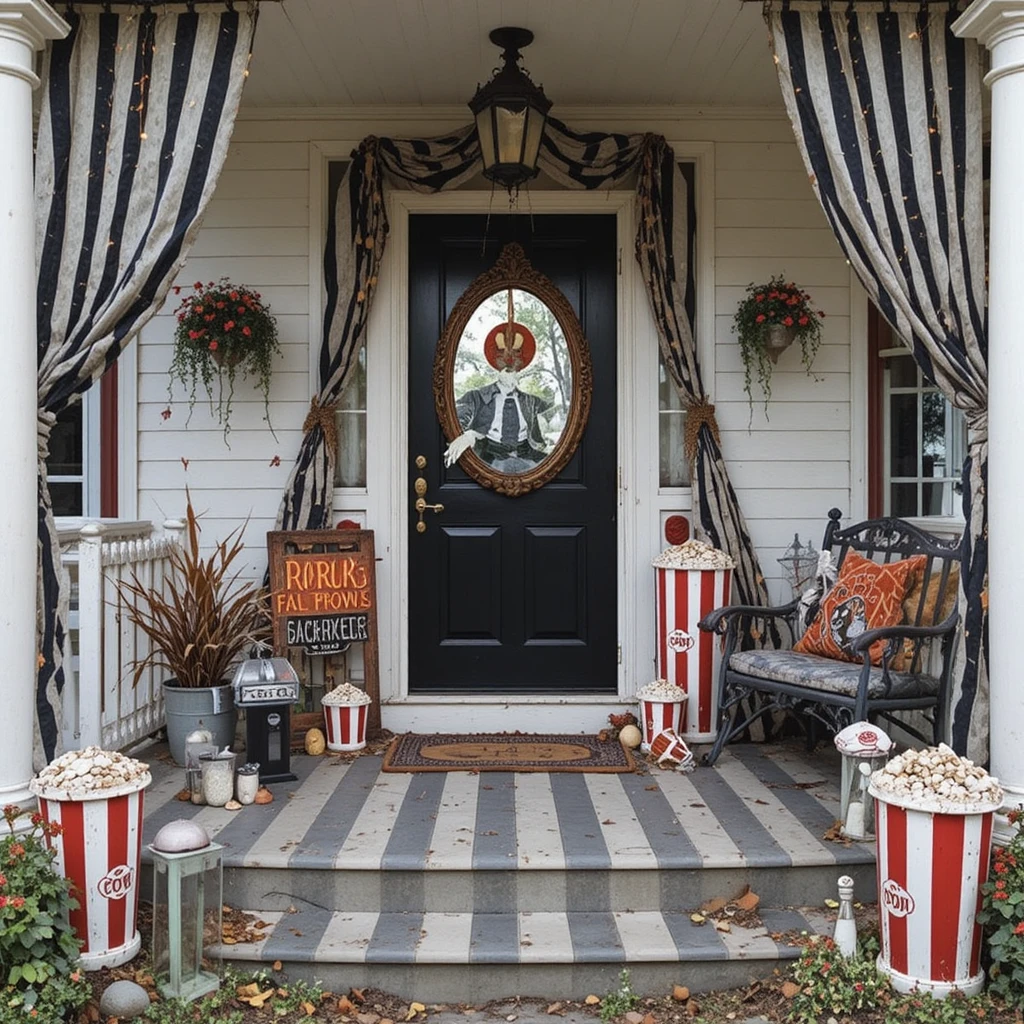
Haunted Carnival
Transform your porch into an abandoned carnival with this creative theme. Use striped fabric in black and white or red and white, vintage carnival signs, old popcorn containers, and creepy clown imagery. String lights arranged in classic carnival patterns add authentic midway atmosphere.
Include carnival game references—knock-down milk bottles, ring toss displays, or fortune teller imagery. A vintage mirror with a “Hall of Mirrors” sign creates fun photo opportunities. Balance playful carnival elements with unsettling details like damaged toys or broken game pieces for perfect creepy carnival effect.
This theme offers opportunities for interactive elements—set up a simple carnival game for trick-or-treaters to play for bonus candy. The combination of nostalgia and horror inherent in carnival imagery makes for memorable, distinctive Halloween decorations
Maintenance Tips Throughout Halloween Season
Daily Decoration Checks
Inspect your Halloween front porch daily throughout the season. Wind, weather, and curious visitors can shift, damage, or displace decorations. Quickly adjust items that have moved, replace batteries in battery-operated decorations, and remove any accumulated debris.
Pay special attention to hanging decorations—ensure fishing line hasn’t tangled and that hooks or mounting points remain secure. Check electrical connections for moisture or damage. Address small issues immediately before they become larger problems.
Take photos of your initial setup to reference throughout the season. This helps you restore decorations to their original positions when needed and serves as a record for next year’s planning.
Weatherproofing Strategies
Even when using weather-resistant materials, extra protection extends decoration lifespan. Apply clear sealant spray to painted cardboard or wood pieces. Store fabric decorations inside during rain, or treat them with water-repellent spray.
Create protective covers for delicate items using clear plastic sheeting that allows visibility while blocking moisture. Position valuable decorations under roof overhang when possible. Bring battery-operated electronics inside during severe weather to prevent moisture damage.
Consider creating waterproof bases for decorations using plastic sheeting or waterproof tarps as foundation layers. This prevents ground moisture from wicking into decoration materials while remaining invisible beneath your display.
Storage Planning
As you create and display decorations, think ahead to storage. Take photos of your setup from multiple angles before disassembling. These references will be invaluable next year when recreating your display.
Group decorations by theme or material type when storing. Use labeled plastic bins rather than cardboard boxes that can deteriorate or attract pests. Wind string lights around cardboard pieces to prevent tangling. Stuff fabric decorations with tissue paper to maintain shape.
Create an inventory list of decorations and their storage locations. Note any items that need repair or replacement before next Halloween. This organizational approach saves time and frustration when decorating in future years.
Conclusion: Creating Your Signature Halloween Front Porch
The most successful scary Halloween front porch decor combines creativity, planning, and personal style. Start with a central theme or concept, then layer decorations to create depth and atmosphere. Balance spooky elements with safety considerations, and don’t be afraid to experiment with new ideas each year.
Remember that effective Halloween decorating isn’t about spending the most money—it’s about thoughtful placement, creative DIY projects, and attention to atmospheric details like lighting and texture. The decorations that resonate most are those reflecting your personality and creativity.
Begin planning early, collect materials throughout the year, and involve family members in creating your display. The memories made while decorating together often become as treasured as the Halloween celebration itself. With these ideas and techniques, your front porch will become the neighborhood’s most anticipated Halloween destination, creating magical and spooky experiences for all who visit.